We all like to ensure our caravans and tow tugs operate effectively and efficiently. When it comes to packing our caravans. The confined space of a caravan compared to our homes is very different and must be treated as separate living spaces, regardless of how big or small our homes are. When it comes to storage one needs to think very differently to how much you pack, how it is packed and where it needs to be located in your caravan. Being conscious of weights is pivotal to an enjoyable trip, no matter how big or small.
The following hacks we have used in either our caravan, tow tug or ideas taken from friends with other traveling arrangements. Consider your caravan storage structure to determine if these ideas will work for you, or whether you need to make minor alterations to suit your individual situation.
The following are a selection of tips and tricks we have found to work for us since we started full time caravan life back in 2018. Whilst that may seem only a few years ago, we have been camping for over forty years, primarily short trips and those have been with a young family. I am also a Lean Practitioner, meaning I am trained in the art of best practice in storage and process management amongst other things.
Remember there are many useful ideas I have selected here; however, you choose what works best for you and your individual situation. These are our experiences, yours will be different.
Before we start, if you are a first time caravaner or have a completely new caravan and need to do a refit, I hope these ideas will help you. Here are my go to items:
- Tape measure & phone
- Notepad to draw the items OR use your smart phones notepad and add photos to your notes
- colour scheme – take photos of your van so you can head off shopping with confidence
- Google search, Instagram, Pinterest for inspiration.
If you are looking for ideas to reduce weight across your van, each section has tips for you to explore. The key point to remember is that when looking at weight it is difficult to provide a one-size-fits-all here as every van has a different payload. In our last 8 years we have had two very different caravans and have gone from a 400kg payload to a 900kg payload, our tow tug has not changed.
- Internal Decorating
- Inside Storage
- External Hacks
- Cleaning and Maintenance (Van)
- Setting the Van for Travel
- Ute Hacks and Upgrades
Internal Decorating
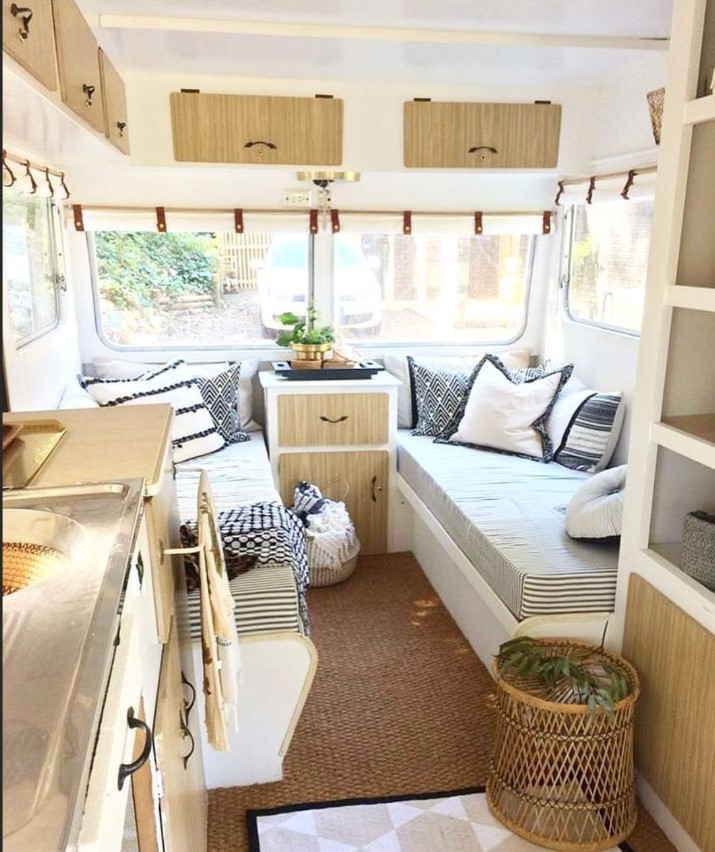

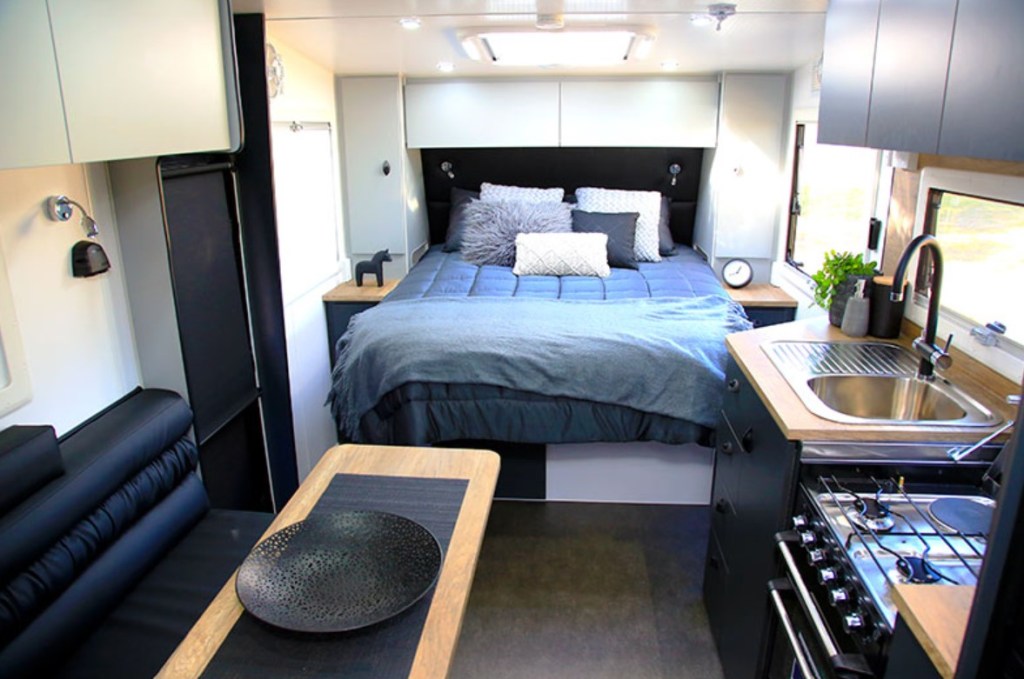
Decorating your van is a very personalized thing. It’s about putting your personality into the caravan through colours, soft furnishings, decorative items and more.
Its no different to decorating a home. The best way to start is with a theme or ideas board. To identify your colours, go to Bunnings and obtain small sample swatches of the laminate that match your caravan interior then move to the paint section and find paint colours swatches in the hue you have in mind.
Place all the swatches onto a small board, take a photo then hit the soft furnishings stores, Kmart and the like to find the decor items that fit in your colour board.
If you are not creative or don’t feel confident to do these, there are many Instagram pages where you can obtain inspiration or support. There are a lot of supportive pages that can offer ideas and help. https://www.instagram.com/coral.and.coast_van.interiors/# https://www.instagram.com/dropbearstorage/
Inside Storage
If your payload is limited or low, there are some simple things to do without compromising your travel experience. Start with this simple test, take a full glass bottle of any product and weigh it on a set of kitchen scales. The product states 300ml but the glass alone is also 300gm, thus the entire weight can be close to 600-700gm. Multiply that by the 6 products of the same size in your fridge or pantry and you have 3.6kg. Whilst this doesn’t seem much, it can make an impact on those with limited payloads.
Consider these options:
- plastic containers are lighter than glass. Use for preserves, condiments, etc. Purchase containers equivalent to the bottles you are replacing so there is no waste, then after de-cantering, remember to label your containers.
- Herbs – transfer herbs from the container to plastic bags. They will take up less space and weight. Consider making up your own herb/spice mixes. Go to our ‘Cooking Tips’ for the recipes.
- If you like baking, consider using packet cake mixes to reduce the amount of flour carried.
- Bulk purchasing of dry foods isn’t an option when traveling.
- Beer – drink from cans as bottles take up more space, have the potential to break, weigh more than the equivalent of stubbies. You will also find some locations across Australia don’t sell stubbies.
- Wine – research wine in bladders (not casks) which the quality is very good. Alternatively, only buy enough wine to drink between shopping.
- Use of cardboard boxes and/or plastic crates/boxes as storage are great choices. Cardboard boxes can be cut down to size then taped up. If you like continuity and your boxes are on display, consider covering the boxes with paper or contact.
Pantry
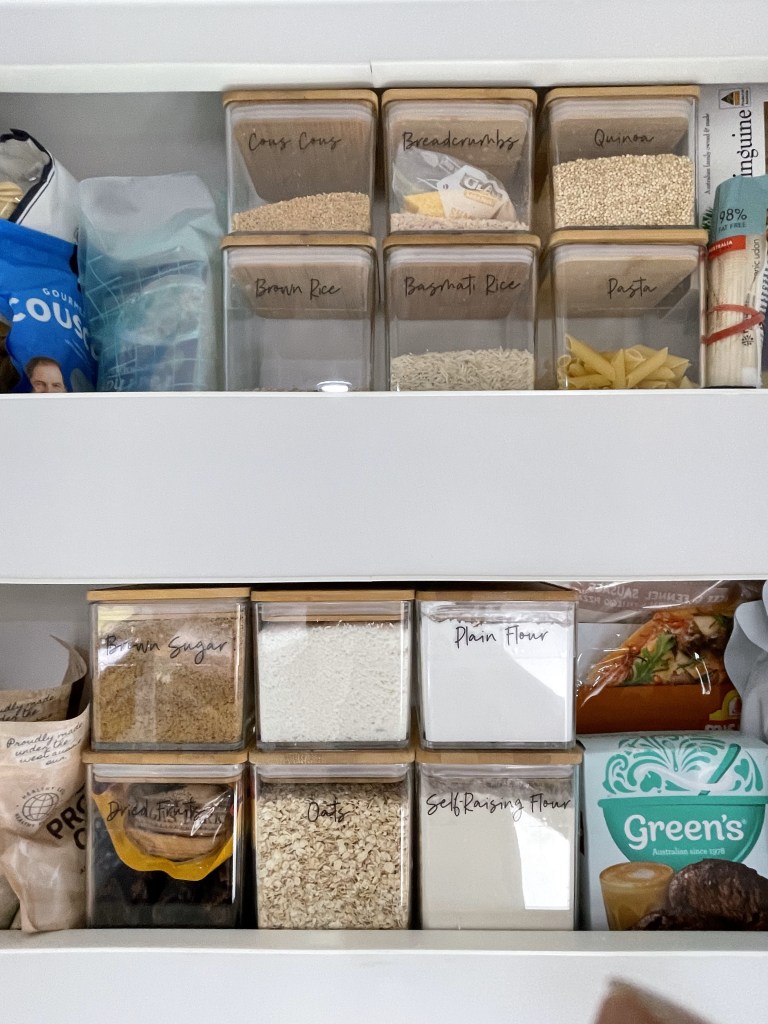
When we are on the road full time we like to eat well and I love to cook. To do this we make a lot of our dishes rather than buying prepared items that can be full of sugar, carbs and preservatives. Therefore, my pantry is loaded with fresh produce, products, herbs and spices. I actually make up my own spice mixes.
I’m a huge Kmart fan as you can see!! These great little containers from Kmart are the perfect fit for our pantry. Our pantry space is 90mm wide, so the containers need to be specific in size and these are perfect. 90mm until about 3/4 high then they are about 95mm. The clear Perspex with the bamboo lid ensures your pantry has clean lines and easy to identify what’s in the containers. There are 3 sizes available in this range, i’ve used the small and medium size only putting four sets per shelf. There are similar containers from Systemic and Kmart, check them out.
I can hear you asking, do they move in transit? Believe it or not they actually don’t. However, I am always cautious when opening any of my storage cupboards when we first stop. Australian roads are not perfectly smooth!!
Fridge and Freezer

We have a Dometic 180L fridge and I am delighted to say my Tupperware fridgesmart/ventsmart containers fit perfectly on the shelves. They also fitted into my previous small Dometic fridge.
If you have never used these before, trust me they are fantastic for any fridge in keeping your fruit and vegetables fresh. Now I did a test when they first brought these out. I stacked the containers with fruit and vegetables then placed the same products in plastic bags and the same just on the shelf in no container or bags. Two weeks later the food in the Tupperware containers were still fresh and the other food I had to throw out before the week was out.
- Containers help to keep your fruit and vegetables in one place and not getting lost in the fridge. Whether they are Tupperware or another brand as long as they are able to keep the food at the right ventilation.
- Collapsable food containers are wonderful for the fridge. As you use the food you can collapse the container making more space in your fridge or cupboard.
- Plastic zip lock bags are great, remove as much air as possible. You can even put pre-prepared meals into the double zip-lock bags then freeze flat. If using to store lettuce, place paper towels in the bag to absorb the moisture created by the cold environment.
Stacking the fridge for travel requires ensuring items are stacked closely. Having a full fridge is better than an empty one. If you travel light, use a plastic basket to stow light/small items into. The inside fridge door must be packed tightly to prevent items from falling over.
Freezer – I’ve had a single small freezer, but still managed to store 10 days of frozen meat for two people plus a couple of other items. Most modern fridges in new vans have the larger freezers and I must say it’s been a dream having so much freezer space. However, I still use the same storage techniques in my bigger freezer. Using a Cryovac helps to maximise on space. I Cryovac all our meat then stack them into plastic containers for easy storage in the freezer. You can easily triple your storage when you store food this way.
Kitchen

If you like your kitchen sink area to look clean, tidy and smart, then this little find has been a wonderful improvement to making my new kitchen bench look classy. Whilst this isn’t a bargain buy, it is a beautiful piece that you can refill with your own products or use the company refills.
i just love how each container interlocks with the other and they are all secured in a neat base ensuring it all stands on your bench making a statement. When we travel, I simply place the entire cluster into the sink. See traveling hacks.
Check out the website for more products from this clever range. I’ve since added a duo to the Ensuite (handwash and hand cream) and a duo to the shower (shampoo and conditioner). They are not just very classy, they are strong, durable and timeless.
Home, Hair, Body & Skin Care Products – al.ive body (alivebody.com.au)
Under Sink Cupboard

Under the sink is an area in my new caravan that gave me some cause for concern on how I was going to store the things I wanted to keep in this area. I pondered for some time on what was the best way to store items.
The bottom shelf was easy. With the wheel arch taking up half the cupboard, there was only the front half available. But when stacking items in, one needs to ensure they are all fitting snuggling so they don’t fall over in transit. there are two ways to fix this issue. 1) Stack the bottles in containers or as I’ve done here, place a plastic container (that can be used for storage at a later date) in between the bottles.
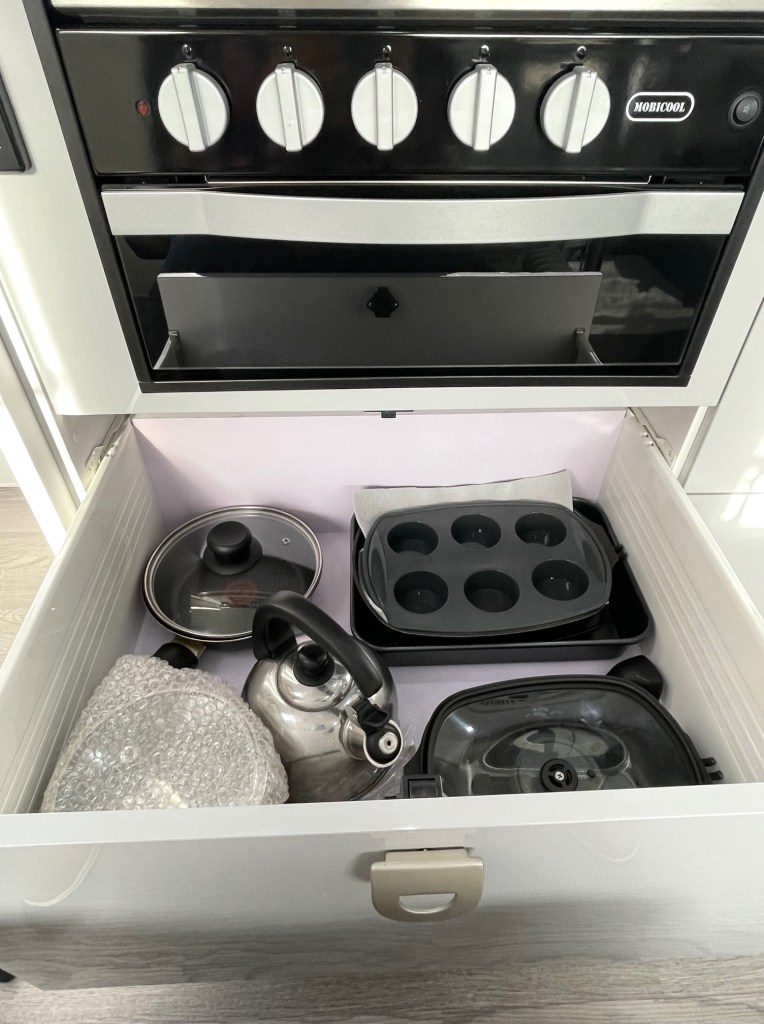
The top shelf had the issue of the plumbing plus the coffe machine (under the towel cover) had to be in this cupboard. A trip to Kmart again. So, the best way to do this is to measure up the space you have, have a list of what items you need to store in the space then head for Kmart. Now it really helps if you locate yourself in a town where Kmart is so you can make regular trips to and fro!!!
The two plastic containers on the top shelf are form the Kmart fridge range. the bottom one has a lid and a handle, so I store items I don’t need immediately, such as plastic gloves, spare dish cloths, etc. The top container holds the washing up items, brushes, dish detergent, wash cloths, etc.
Behind these two containers is my vermin kit!! What you say??? Every caravan MUST have a vermin kit. Ant granular bait and cockroach baits for outside only of course and other items. Singapore ants are found in warmer tropical climates but have been known to be found further south. They can chew through fabric, insulation and rubber goods, causing damage to homes, cars and electrical appliances. Granular baits containing hydramethylnon are recommended for control of any of the tropical ants.
But oh, where do I put the dish drainer???? With a little bit of manipulation it fitted perfectly between the two on the top shelf!!
Ensuite, Washing Machine & Clothesline
The ensuite is now pretty standard in most caravans and ours is no exception. I cannot imagine what it would be like not to have one, especially when one is traveling full time. Gosh we holidayed annually with three children and no ensuite, wow how basic was caravanning life back then?
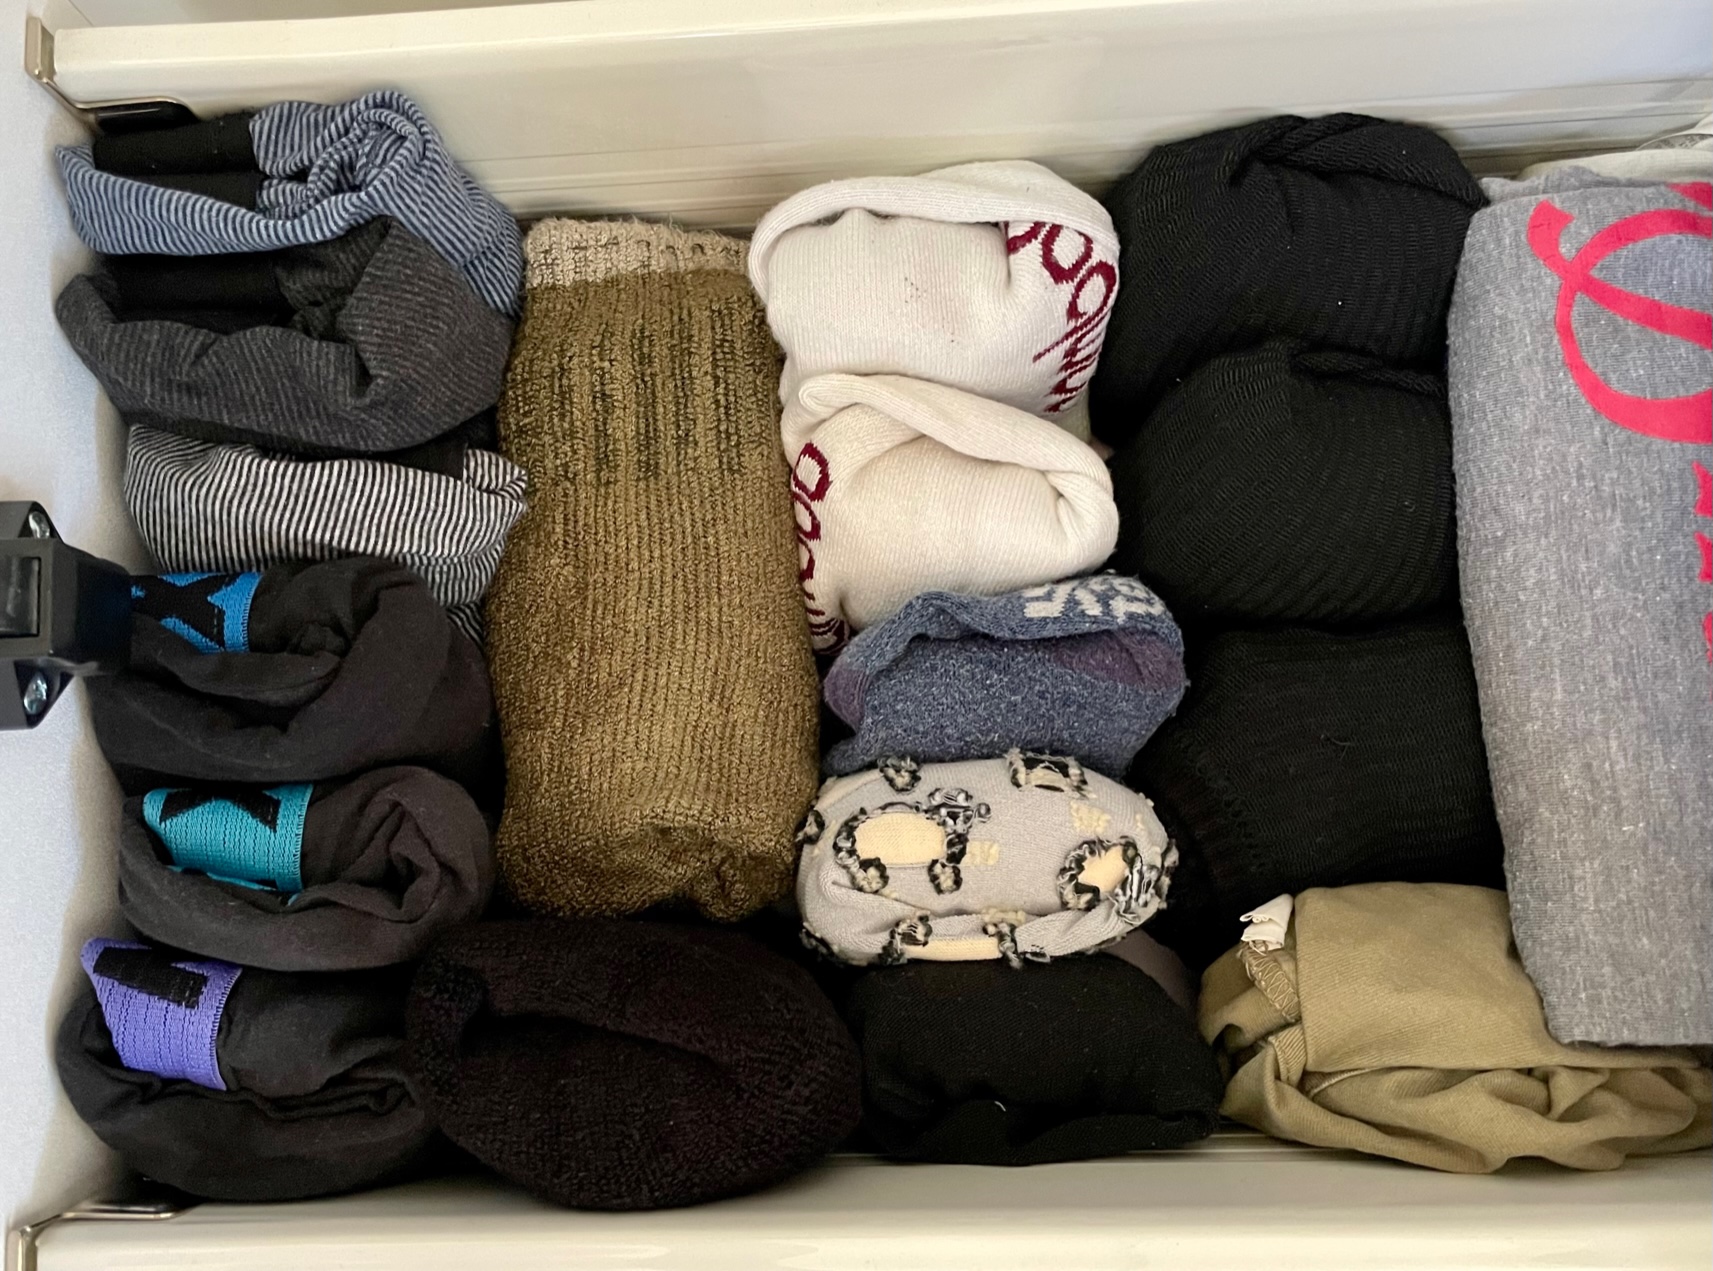
We have drawers as storage and it is such a big advantage. I use the Kmart bamboo boxes or clear fridge storage boxes. Measure your drawer ensuring you allow 4mm for movement of the boxes to fit in and out. The boxes help to keep everything in place during transit.
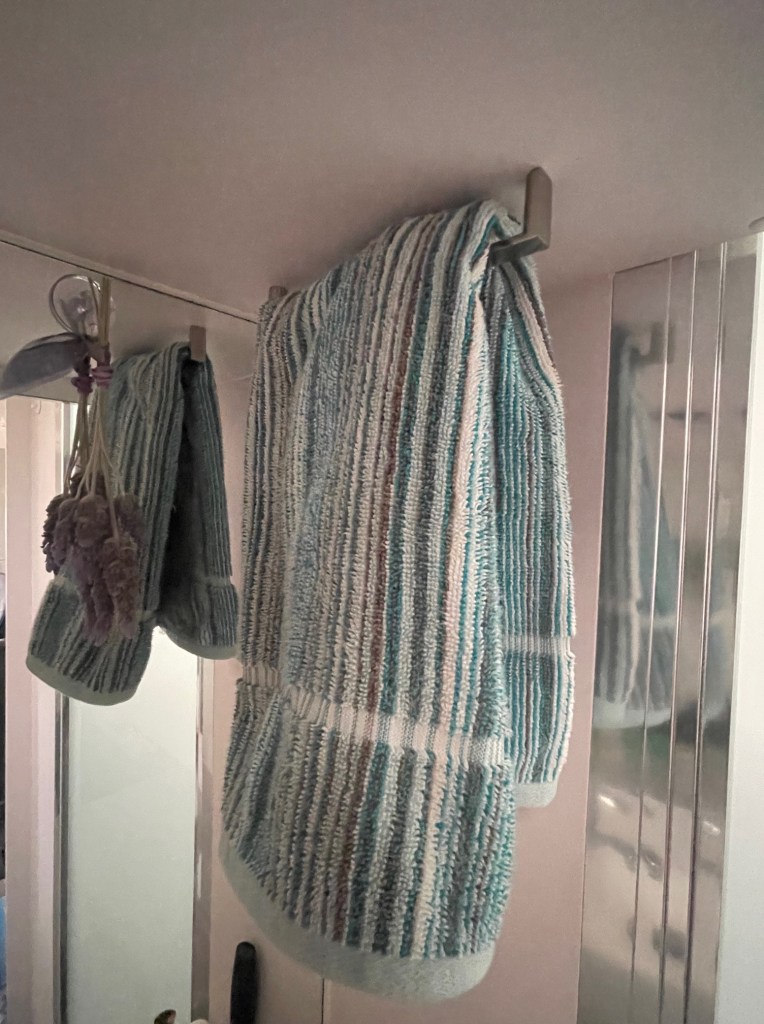
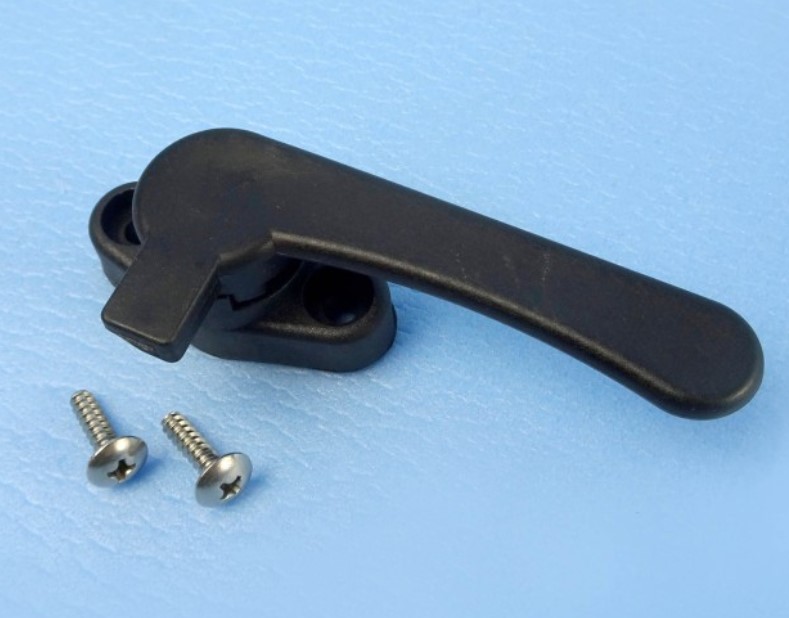
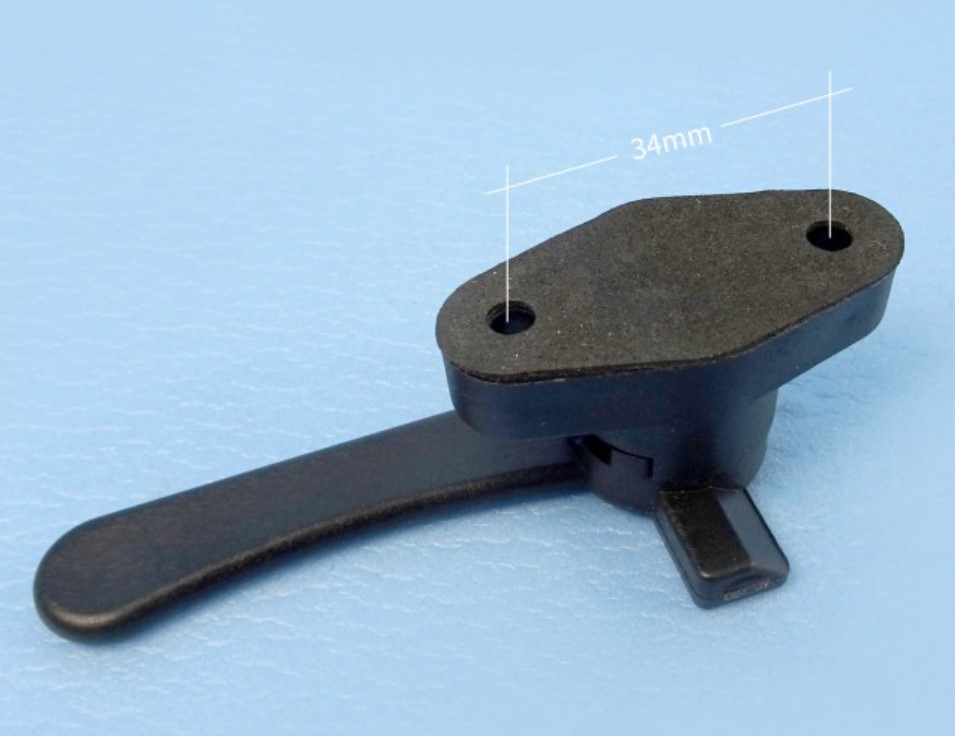
Whilst we have towel rails for the bath towels, we use a hand towel. But where to place it has always been an issue until I saw this idea on a caravan hack page. Sharing ideas is wonderful. Using a standard door handle from Bunnings, your handy person can simply drill from inside the above storage cupboard then screw in the handle to form a hand towel rail!
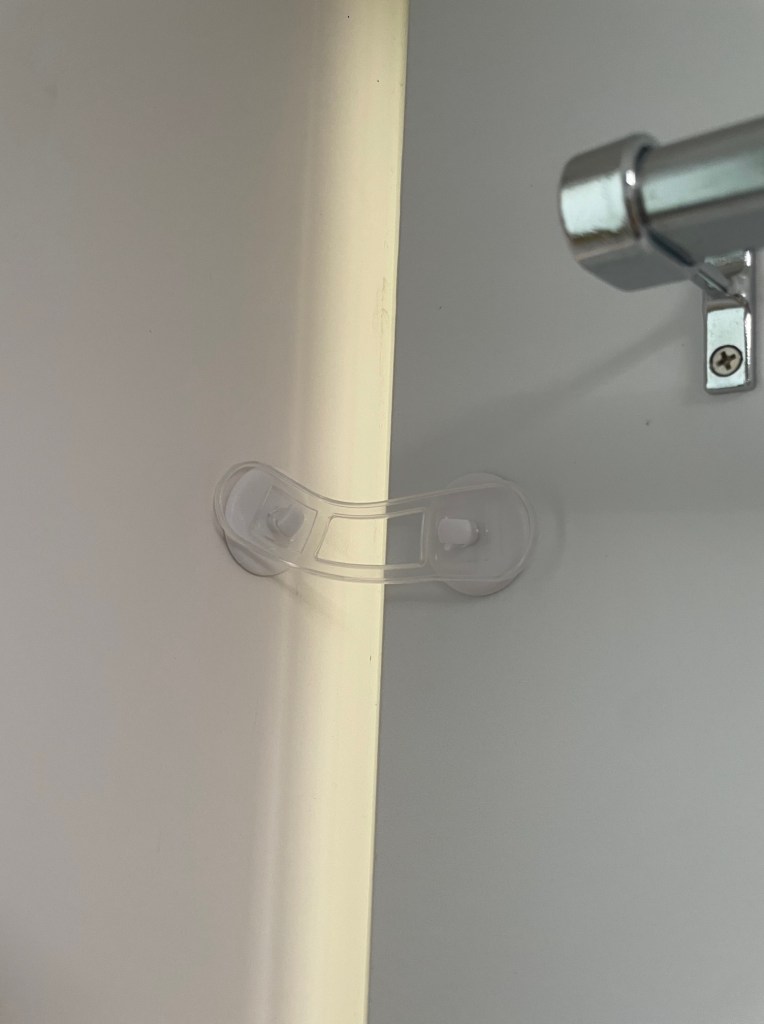
Most ensuites have the sliding doors which unless you van is perfectly level can be an issue if the van is leaning to the driver side!! An easy fix is to purchase the child lock devices at Bunnings. They are stick on, so no screws or nails required. The lock is plastic and simply lays flat and out of the way when not needed.
Laundry

My machine is a 3.2kg upright, so if you have a front loader on the wall, some of this may not be relevant for you.
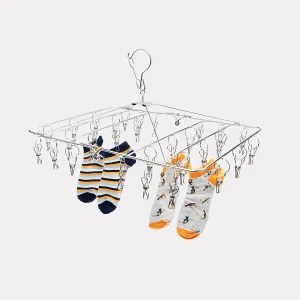
Yes, I do iron whilst I am on the road, I like my cotton garments looking nice thank you!! My ironing cover is simply a standard ironing cover (yes from Kmart you guessed it!!) I cut it down to size to fit the dining table with approximately 150mm overlap on each side, then hem the cut ends. When not in use, the cover fits nicely folded on top of the washing machine, protecting it from the Stainless Steel Airer and hangers stored on top.
Now we all need a clothes line. I’m not one to hang my washing on the lines in caravan parks when I can accommodate my washing under my awning in the shade. We have two options, the first being a stainless steel line attached permanently to the awning legs and the other a mobile double line.
You may have seen this natty idea before. A roll of non-stretchy cord, two pieces of PVC 30mm diameter by 300-400mm length and four end caps. Drill a hole thicker than the cord about 50mm in from each end of the PVC. Thread the cord into the PVC and out the other end when your next hole is. Measure the length required for your awning and thread into the other PVC piece, tie off the ends so the knot is inside the pipe and pop the end caps on. Secure the line over the stabilizer bars on the awning, take the other PVC pipe to the other end and secure, this will give you two lines. Ensure they are firm not sagging. When finished with your line, simply wind the cord around the PVC and put away.

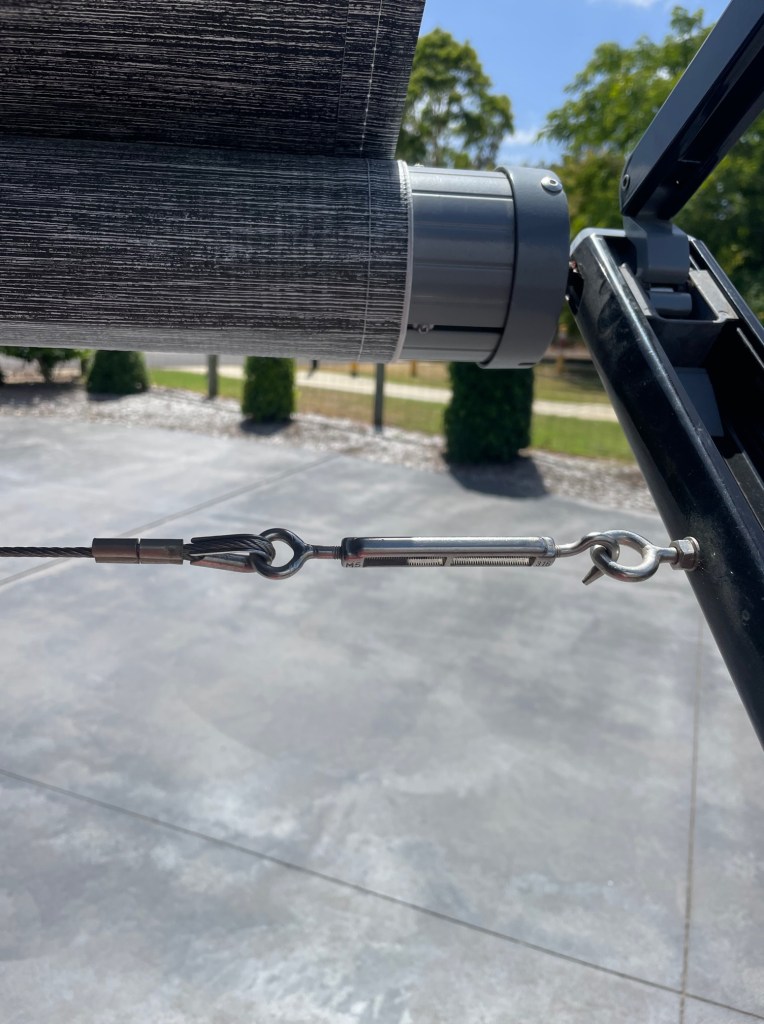
Clothesline on your awning is as easy as obtaining stainless steel parts from any marine shop then find a handy person to install it. The best part is it never needs removing and stays in place even when you roll up the awning. Tip: Before installing, check where the line will be positioned when the awning is in the stowed position, mark it then install.
You can store your washing powder and pegs inside the machine as they will do no harm. Always remember to place the white PVC basket inside the machine to secure it whilst travelling. This stops the barrel from rocking around and causing damage.
Clothing & Shoe Storage
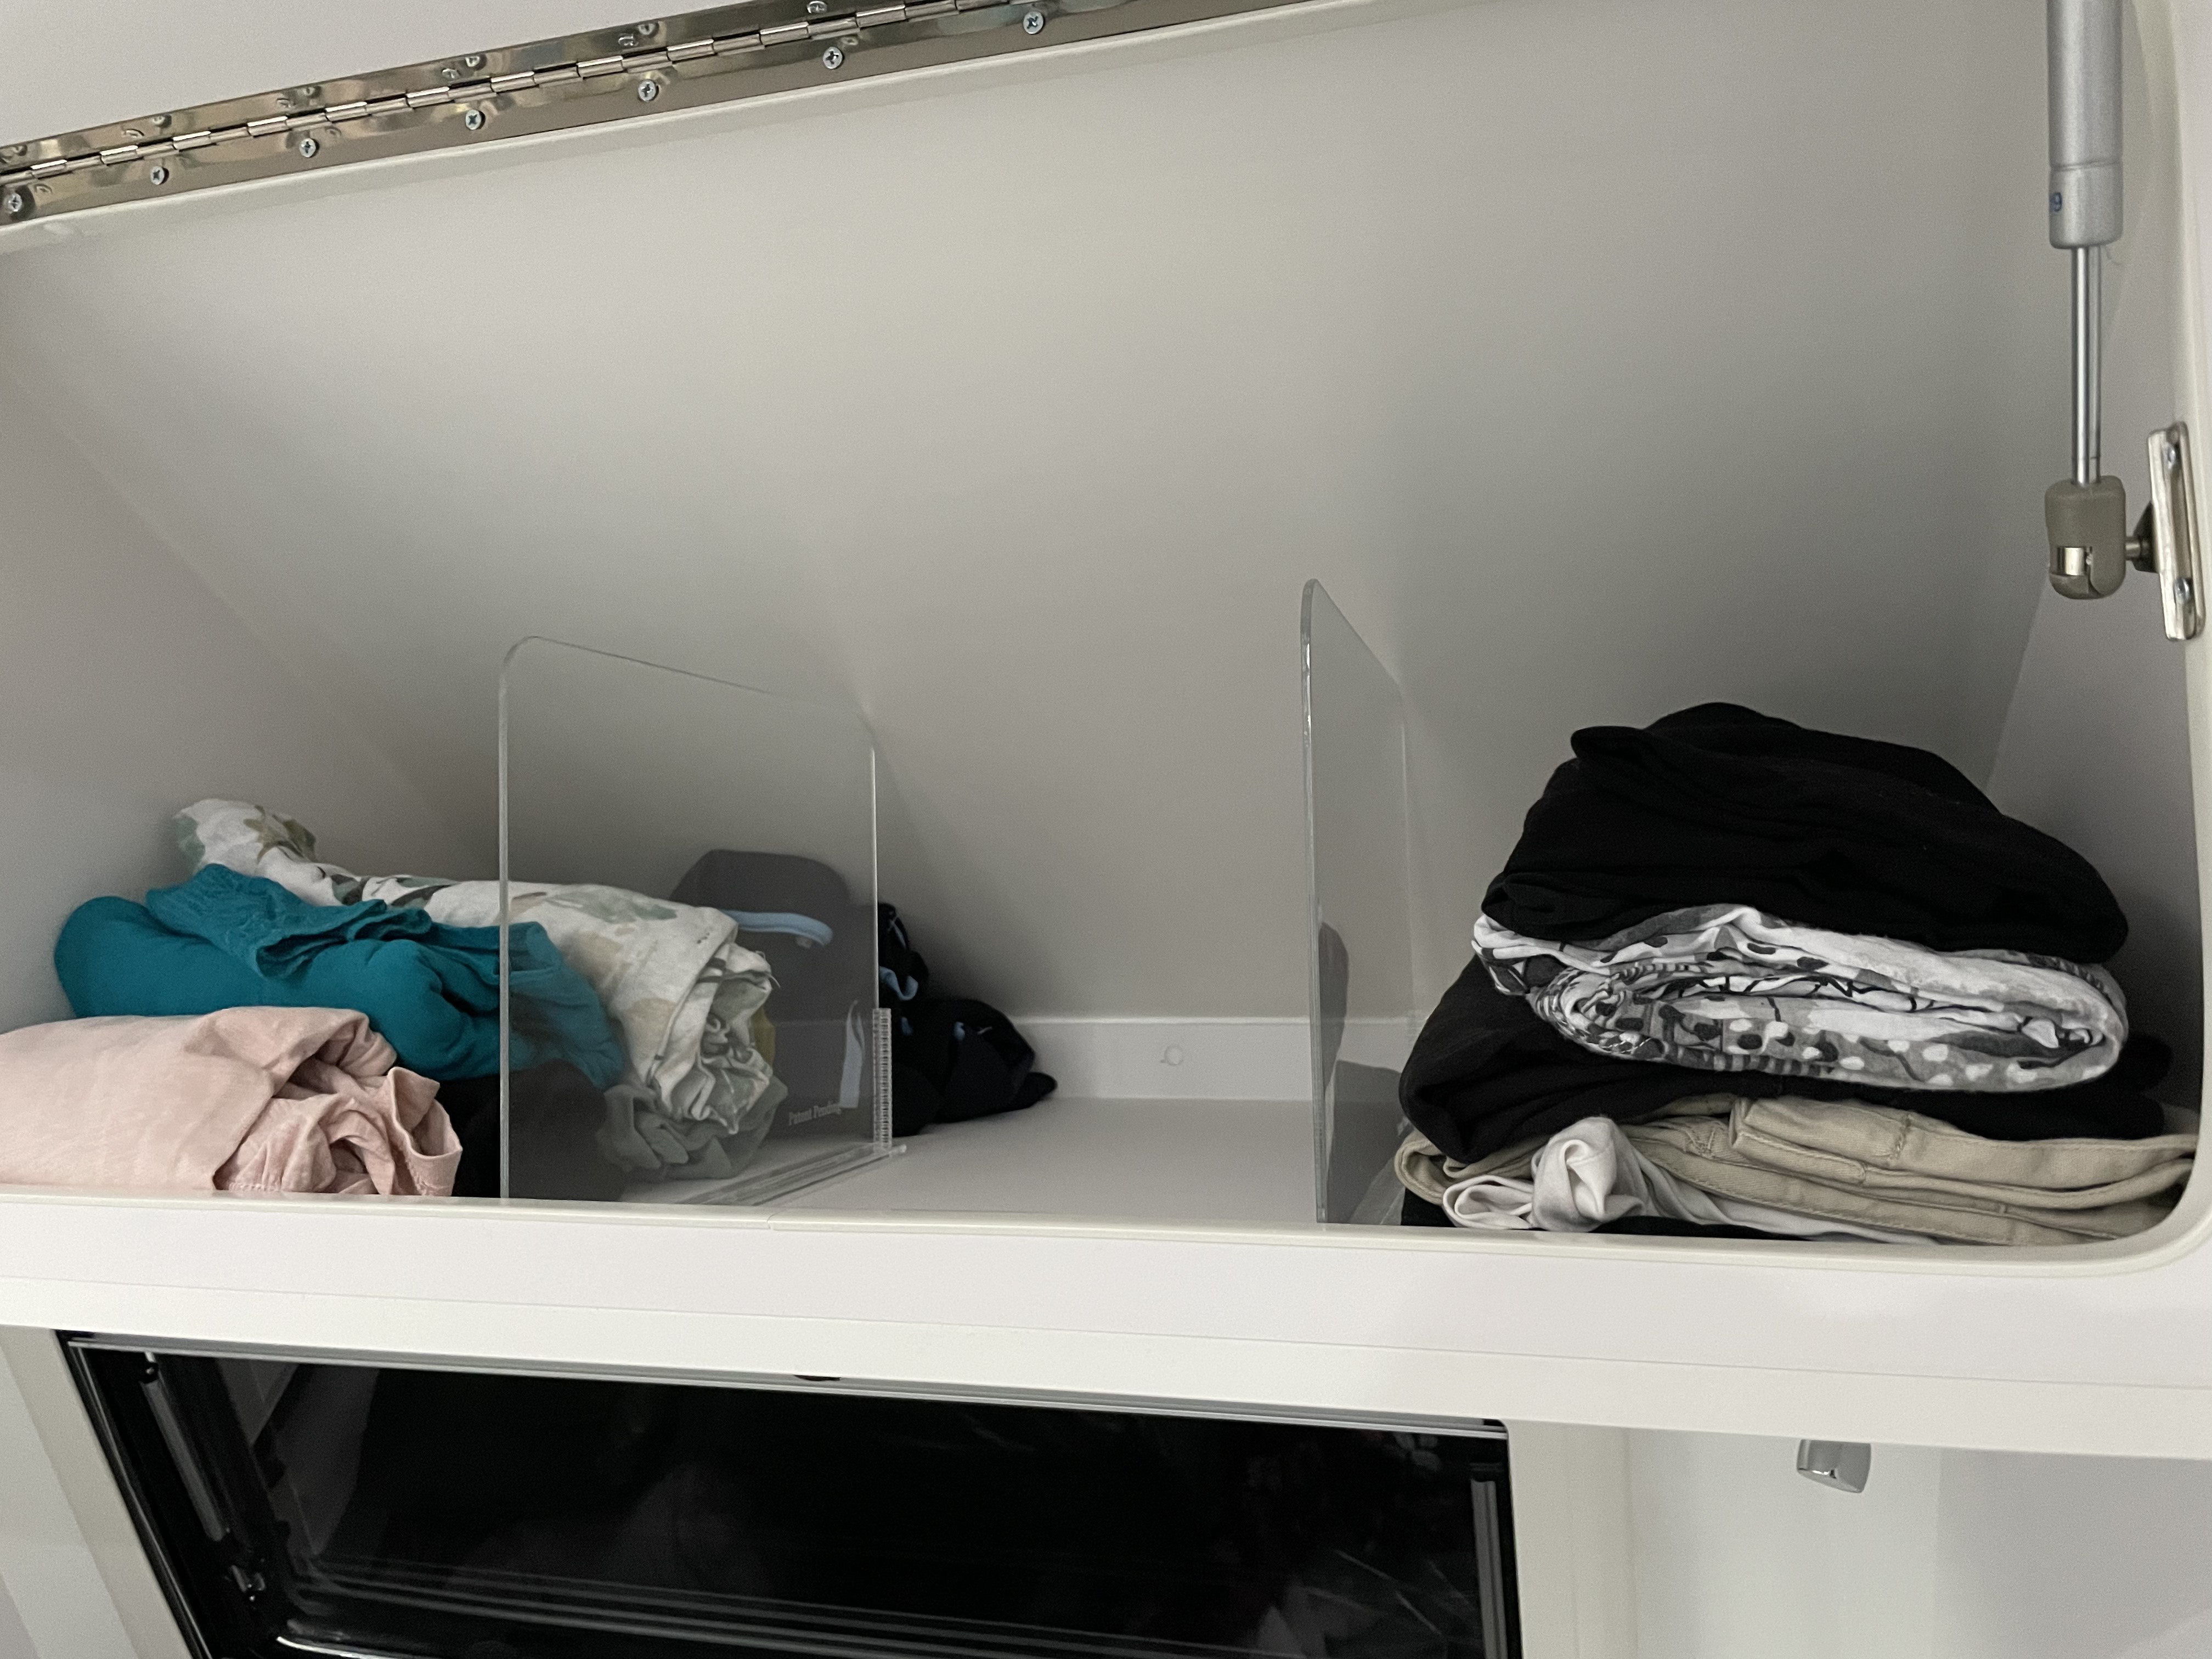

Its a great space and in our van is larger than our previous van. The issue here is keeping your clothes neat and tidy so they don’t roll into each other, or get pushed to the back or fall out when you open the door.
These great shelf dividers, yes from Kmart, are just perfect. Some people use containers and that’s great, but I find I cannot see what is in the containers. After a few years of full-time travel, this has been my savior. They come in a pack of two, but before you install them you need to remove the shelf clip. Using heavy-duty outdoor tape by Permastick (Bunnings), place a strip of the tape along the bottom of the divider then stick securely into place. Being clear Perspex, you are able to see what is on the other side, unless of course your cupboard is like mine and full!! TIP: Ensure you measure the size of the area you are to install the dividers, as if you have a sloping cupboard like the one above, you might need to cut them down before installing.
Do you have overhead cupboards in your ensuite? How many times have you opened it without thinking after setting up at a new site and bamm, down falls items out of the cupboard. The back of your van will bounce more than any other part of the caravan, especially on rough roads. We have solved this issue by placing the same dividers (as above) into the cupboards above our bathroom sink in the ensuite. The cupboards were not as deep, but lucky for me I have a clever hubby who was able to custom fit the dividers to fit. Such a difference now, no surprises when I open the cupboard!!! On the other side we have placed a low basket
Folding your clothes, whether rolling, folding, tucking, whatever the technique you follow on some of the great Instagram clothing storage hacks will provide more room and make you clothes more accessible. I have made it much easier for hubby to access his clothes by using some of those great clothes folding hacks.
Ladies if you have dresses to hang, some of the hacks on Instagram provide these for hanging too. Check out @effectivespaces on Instagram. Once you stop in a location for a period of time, simply take out your dresses and allow them to hang fully (especially the maxi ones). I use the shower to hang them in.
Shoe Storage is always an issue, so keeping them in a location where you can easily access them is pivotal. In a previous caravan we built a custom storage box for shoes and wine bottles at the end of the bed. In our current van we purchased the Navigator caddy which sits neatly in a corner or under the bed. This little buddy stores all my shoes (don’t worry about his!!), keeping them protected, dry and ready for use. For everyday shoes, we use a plastic tub which has a multi purpose use for soaking clothes. We store it outside the door or pop inside the van when travelling.


The Navigator range has given us so many storage solutions and should not be overlooked. There are so many storage ideas for this great little find. Check out the THE NAVIGATOR RANGE – NavigatorGear (NB: I don’t get any benefits from recommending these guys. It’s just how we roll!!)
Caravan Door
Not everyone’s doors are the Camec style as shown, so please use the hacks creatively to suit your caravan door model.

This is a very simple and easy hack to stop your blind from rattling around or unravelling as you travel. Obtain or make up a simple velcro tie and wrap around the blind. When you stop and pull up, simply move it to the RHS and secure over the end so you don’t lose the tie.
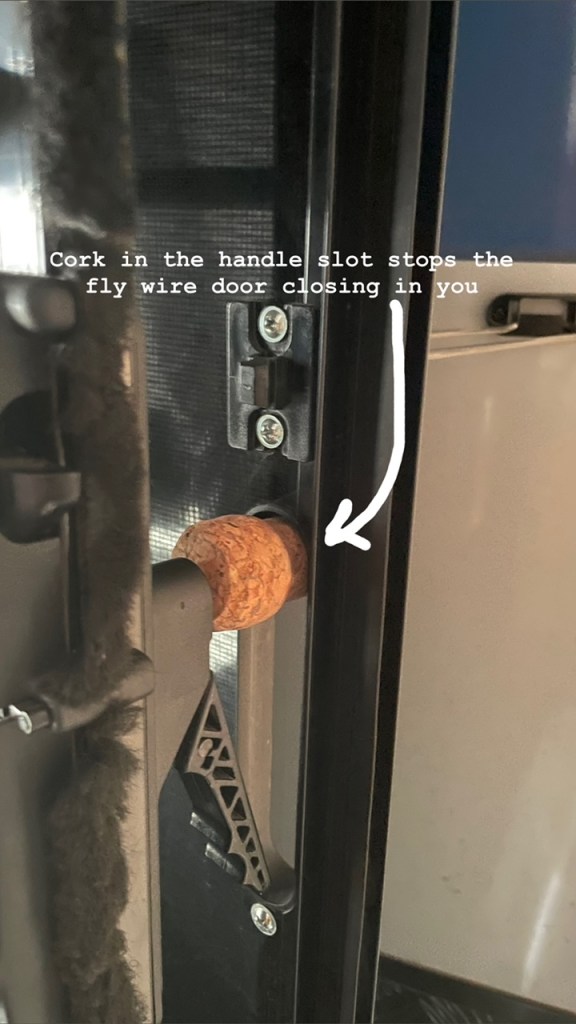
After you have drunk the champagne or sparkling you celebrated with, don’t throw away the cork. Trim down the end and use to place temporarily into the slot where the door handle goes to stop the fly-wire door from slamming shut on you.
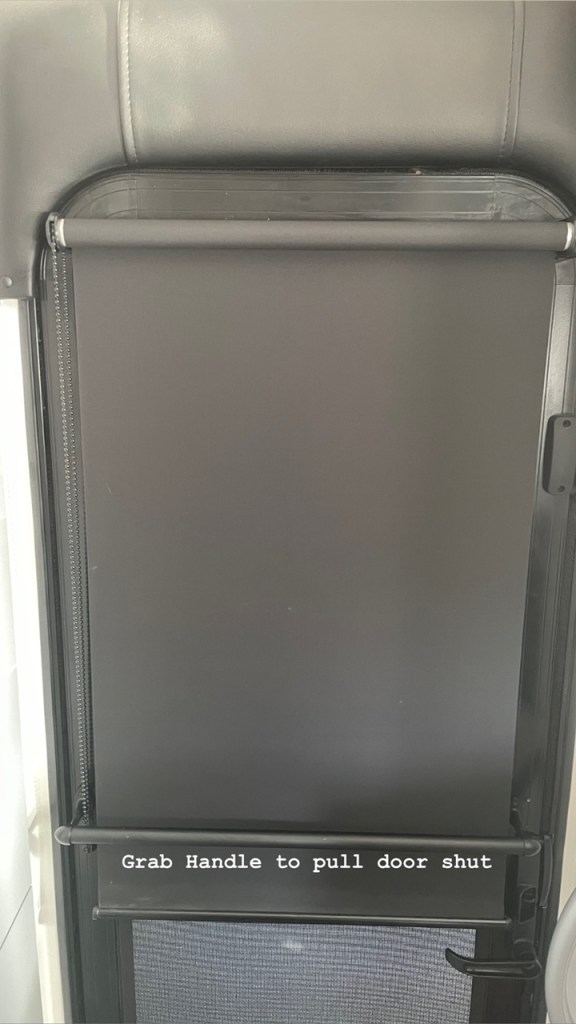
Another little trick provides two solutions. A grab handle to help pull the door shut and a hack to stop the blind from flapping as you open and shut the door with it rolled down. Easy to install, purchase the rod and ends from Bunnings, cut rod to size and install. TIP: On the RHS above the handle (on three-way locking doors), you will need to either cut the supplied screws down or use shorter screws so as not to prevent the internal mechanism from operating correctly. Yep, we learnt the hard way!! Whoops!!
Finally, those doors with the crim-safe screen, the screen will let those nasty little flying bities in. To eliminate this, if you have a fly screen with a slot for the spline you can install another fly-screen on the inside. SImply purchase the standard quantity of fly-wire for a standard door and 4m x 6mm spline and spline tool. There is no need to remove the door to install. If you have a blind, carefully pull the blind out at the LHS and the blind unit comes out easily. Install the fly-screen before cutting to size, starting at the squared bottom section. Once installed, cut back the excess flywire, run the spline tool around the spline to ensure all is in place. Replace the blind making sure the pull-cord is in the right position.
Many thanks to highly experienced caravan friends for these ideas.
External Hacks
Now the outside of the caravan hasn’t been forgotten and I do understand that this isn’t necessarily just the ‘mans’ domain. So ladies read on as you might find something interesting here too!!!
Rear camera
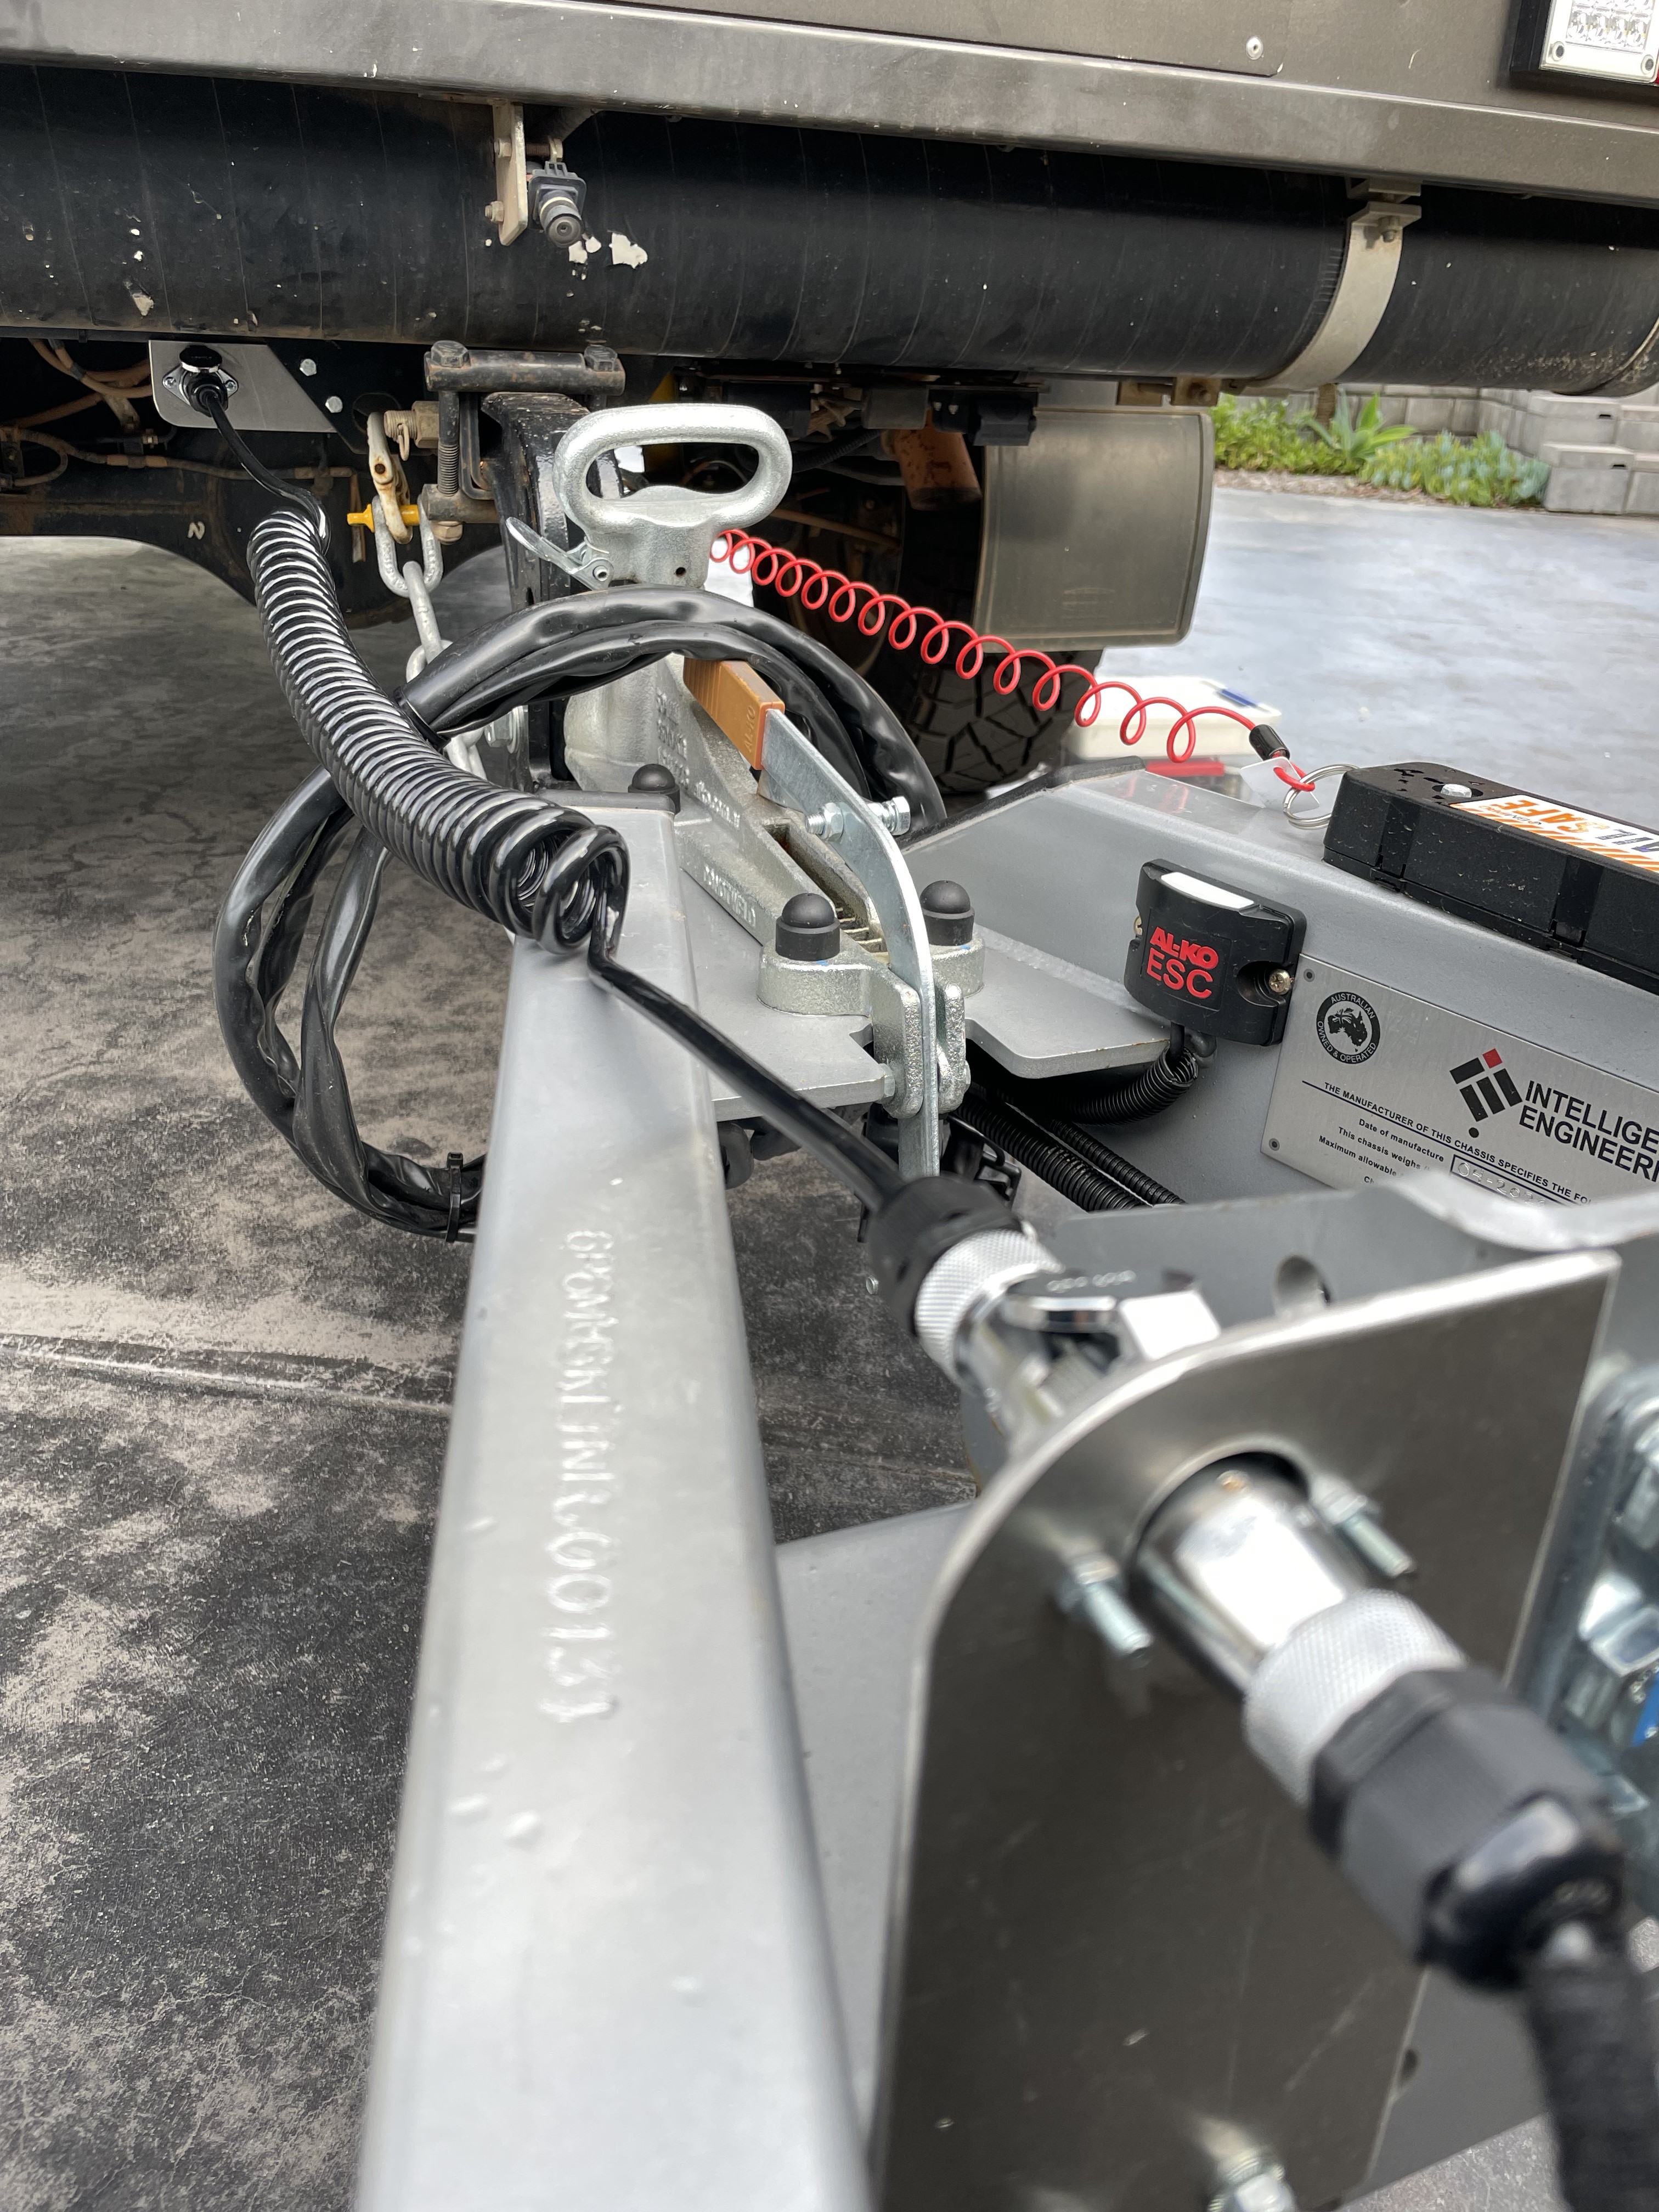
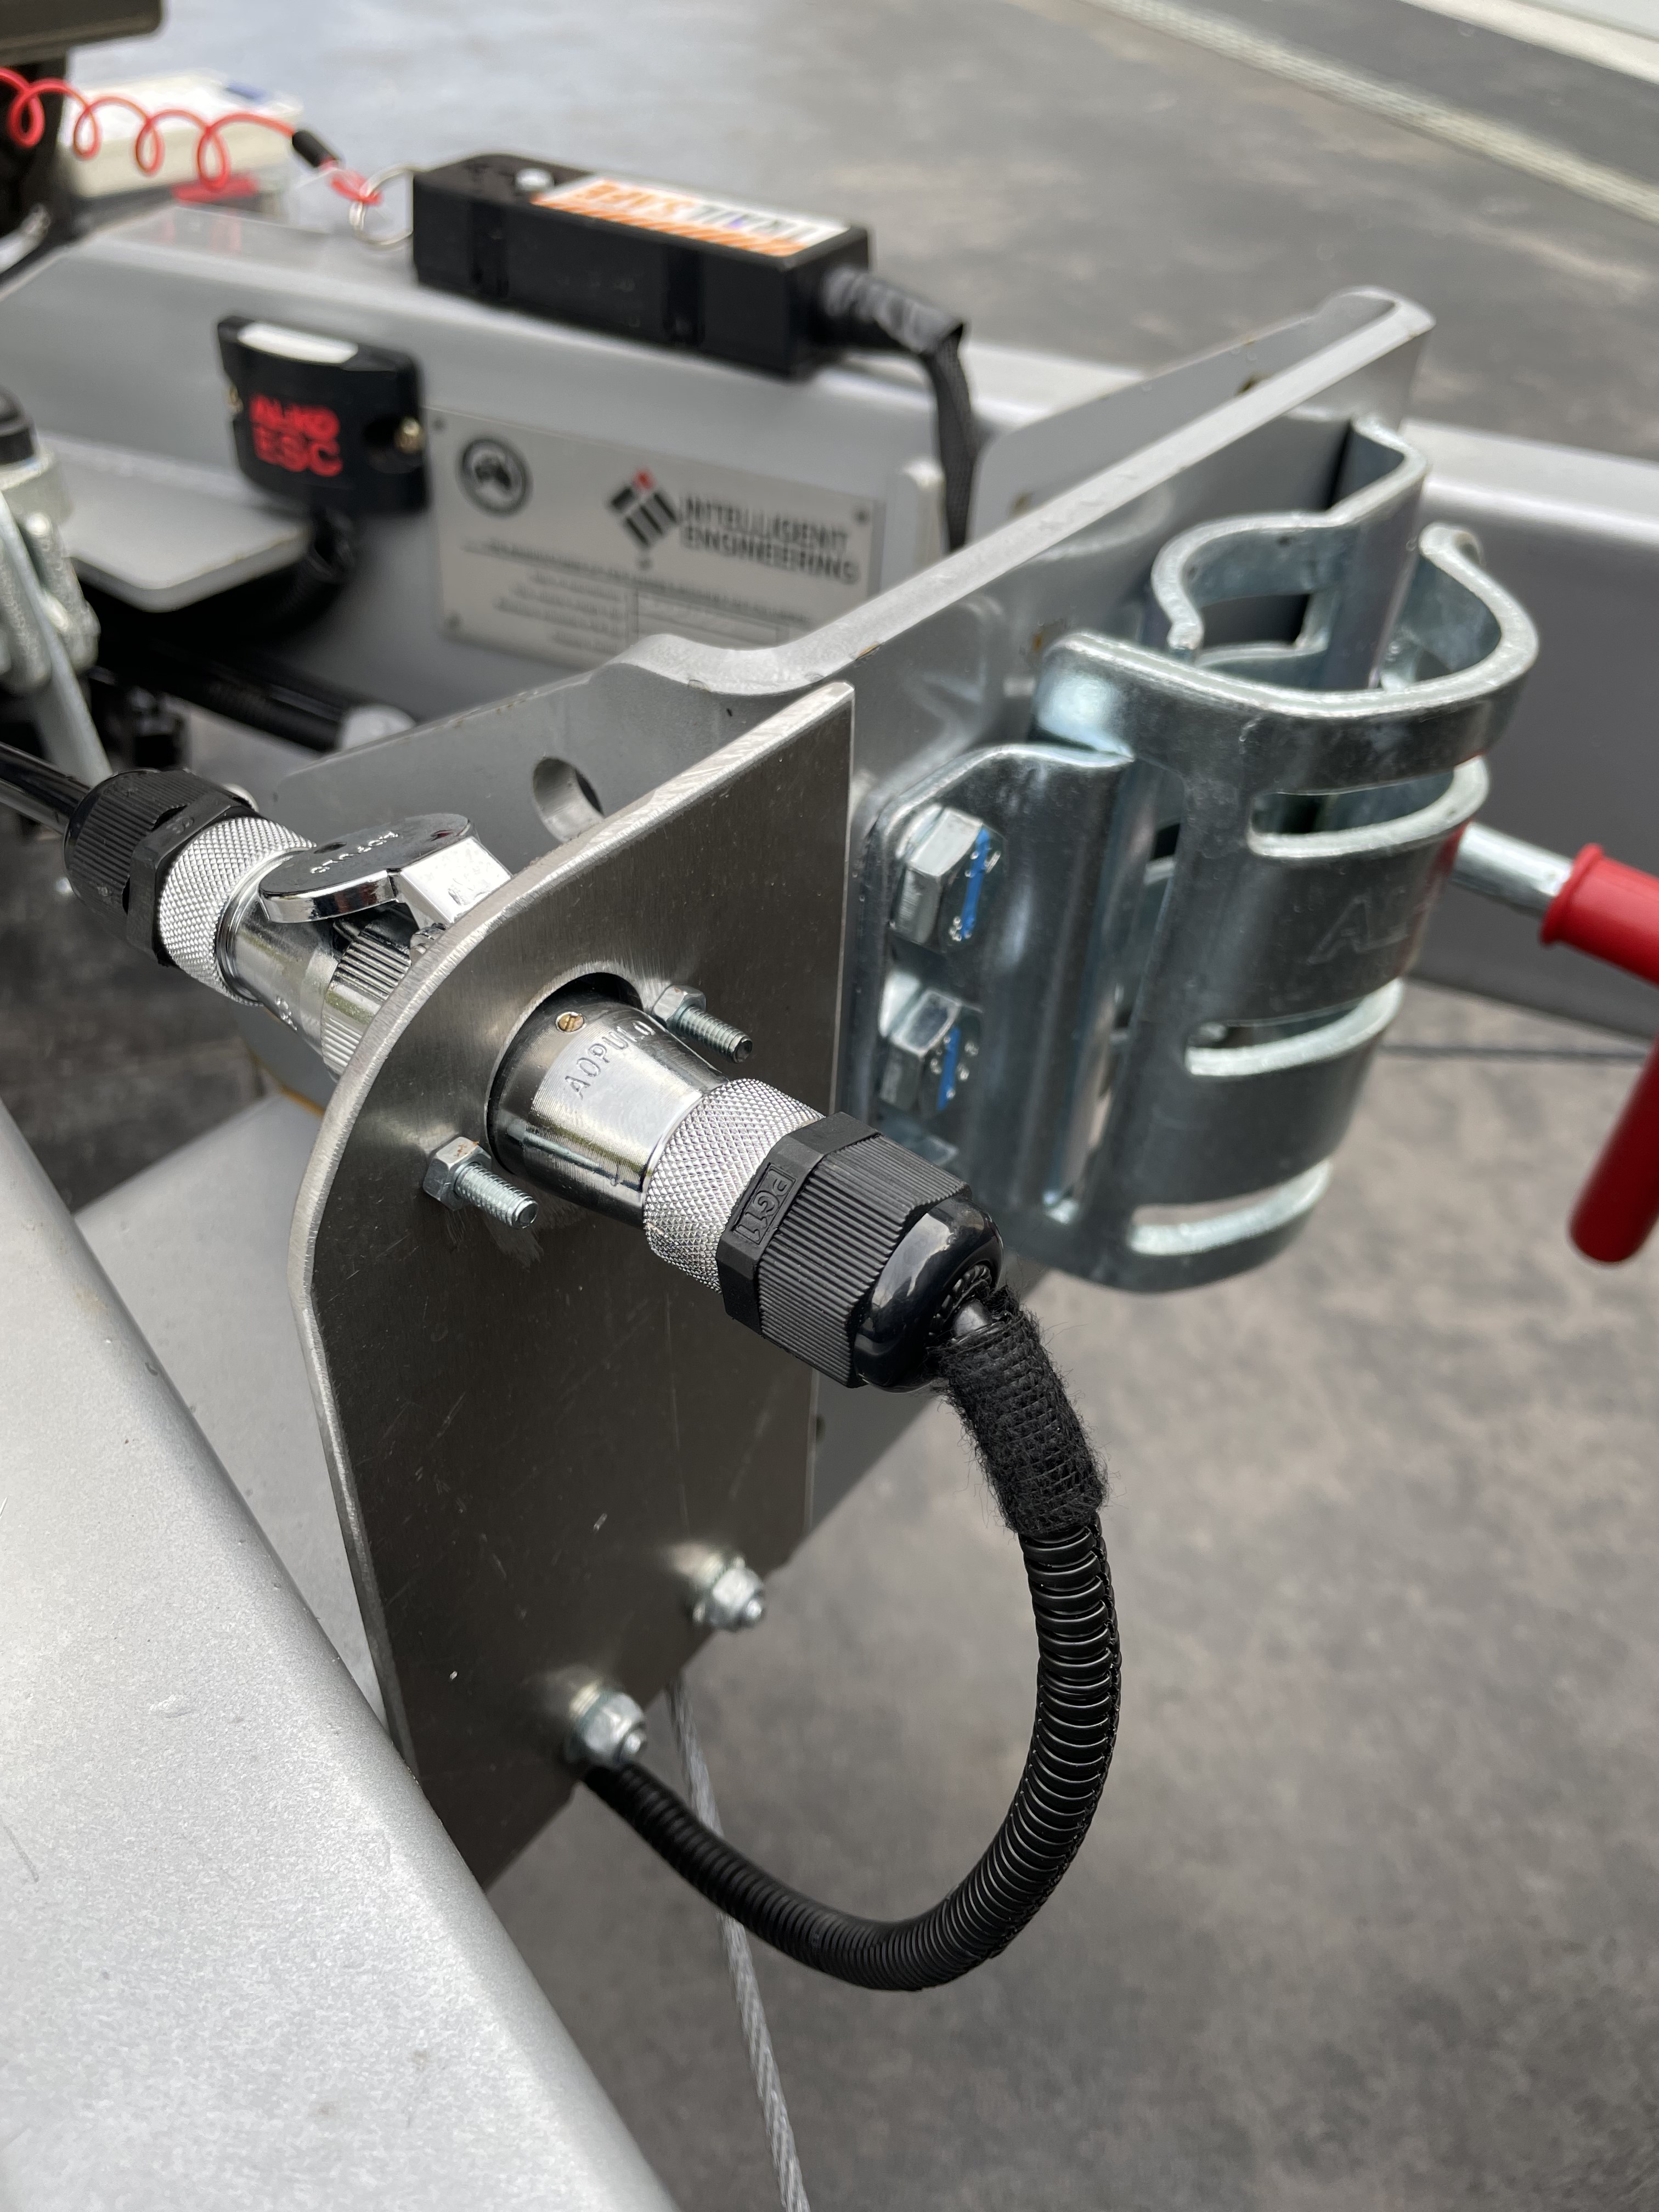
Most caravans have the convenience of a rear camera. The issue we all have is ensuring the connection between the camera on the rear of the caravan and the unit inside the vehicle are securely connected with a quality waterproof heavy-duty connector. The best connection product you can use is to take a leaf out of the trucking industry and use a heavy-duty Suzi coil with quality screw-in waterproof connections.
There are plenty on the market and a price to match. The key to getting the right one is to check your tow tug and the camera wiring harness. The above is the set-up we have in place. the stainless steel plate has been added. Go to any steel fabricator who works in stainless steel and ask for some scrap to be cut to size. The finish will be professional and add value to your investment.
Power Tips


We all have a selection of power cords, equipment for set up etc. These items are not cheap and as they form a pivotal part of our caravan life we like to protect our investment at all times. The Navigator range has an excellent bag to keep all your electrical cords, connector protections, etc in one place and easy to access. Take the extra time to wipe your cords as you roll them up and pack away and their life will be extended. We have a 30m and 10m 15 amp electrical cords.
Cords coiled up present a fire risk. You should always uncoil your cord when plugging into power.
TIP: We have our 15amp cords in orange, and the 10amp cord in yellow.
Trailer Plug buddy – this sits with our electrical cords and setting up equipment. Place the leads for the caravan, including 12v plugs, reverse camera cord, anderson plug, etc., into the bag then securing tightly using the velcro strips, hang the bag via the handle so no weather can access the bag. Saves leads getting damaged by water.
Check out the THE NAVIGATOR RANGE – NavigatorGear (NB: I don’t get any benefits from recommending these guys. It’s just how we roll!!)
Water tap

Is your water tap on the front of the A frame? Is it easy to get to?
There is a solution for that. This will require some dexterity and accessing underneath the caravan. We have repositioned our tap to the rear of the caravan for easier access. What a great concept. And I do have to thank my brother for this great idea.
And now we have 4m of spare John Guest water hose!!
Water Pump Box


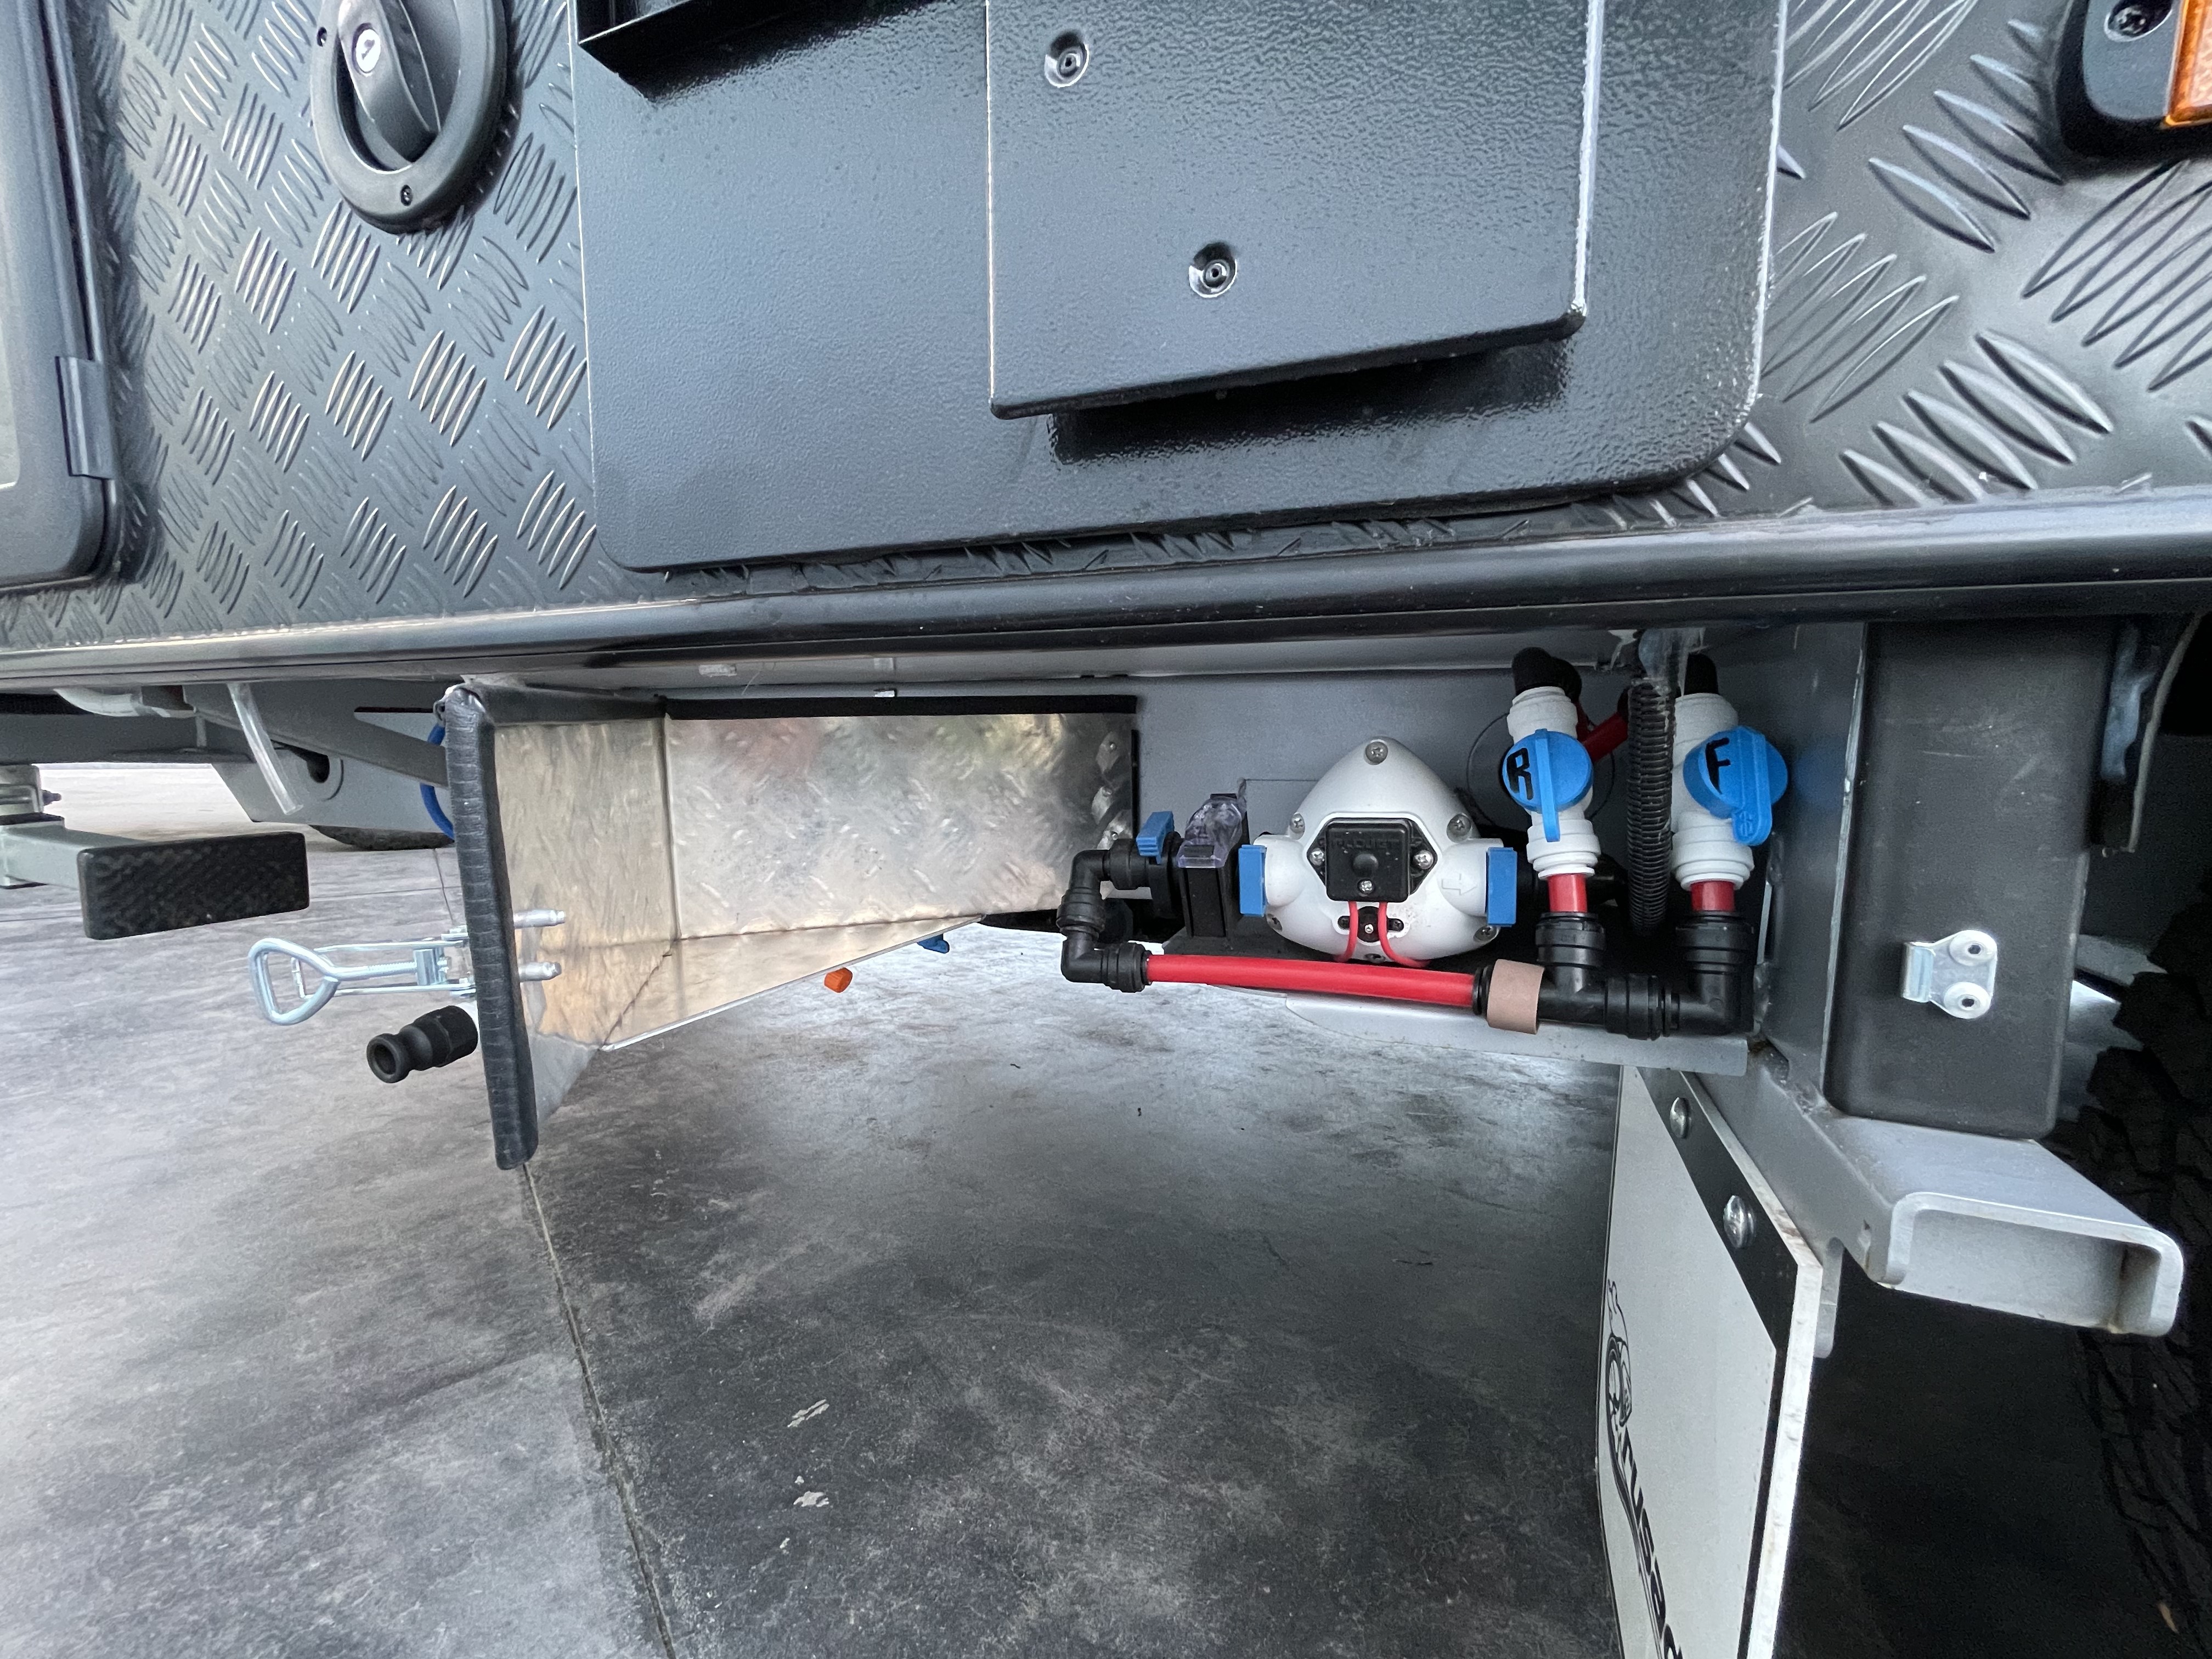
On our new caravan the water pump is located externally. Thankfully as it is very noisy!! But we were not happy with the pump being exposed not just to the elements but also to opportunists!!
After designing the cover and having a sheet metal business cut and bend the aluminum pieces into shape, the box surround was installed. It is not 100% dust proof, but it is secured in a solid case.
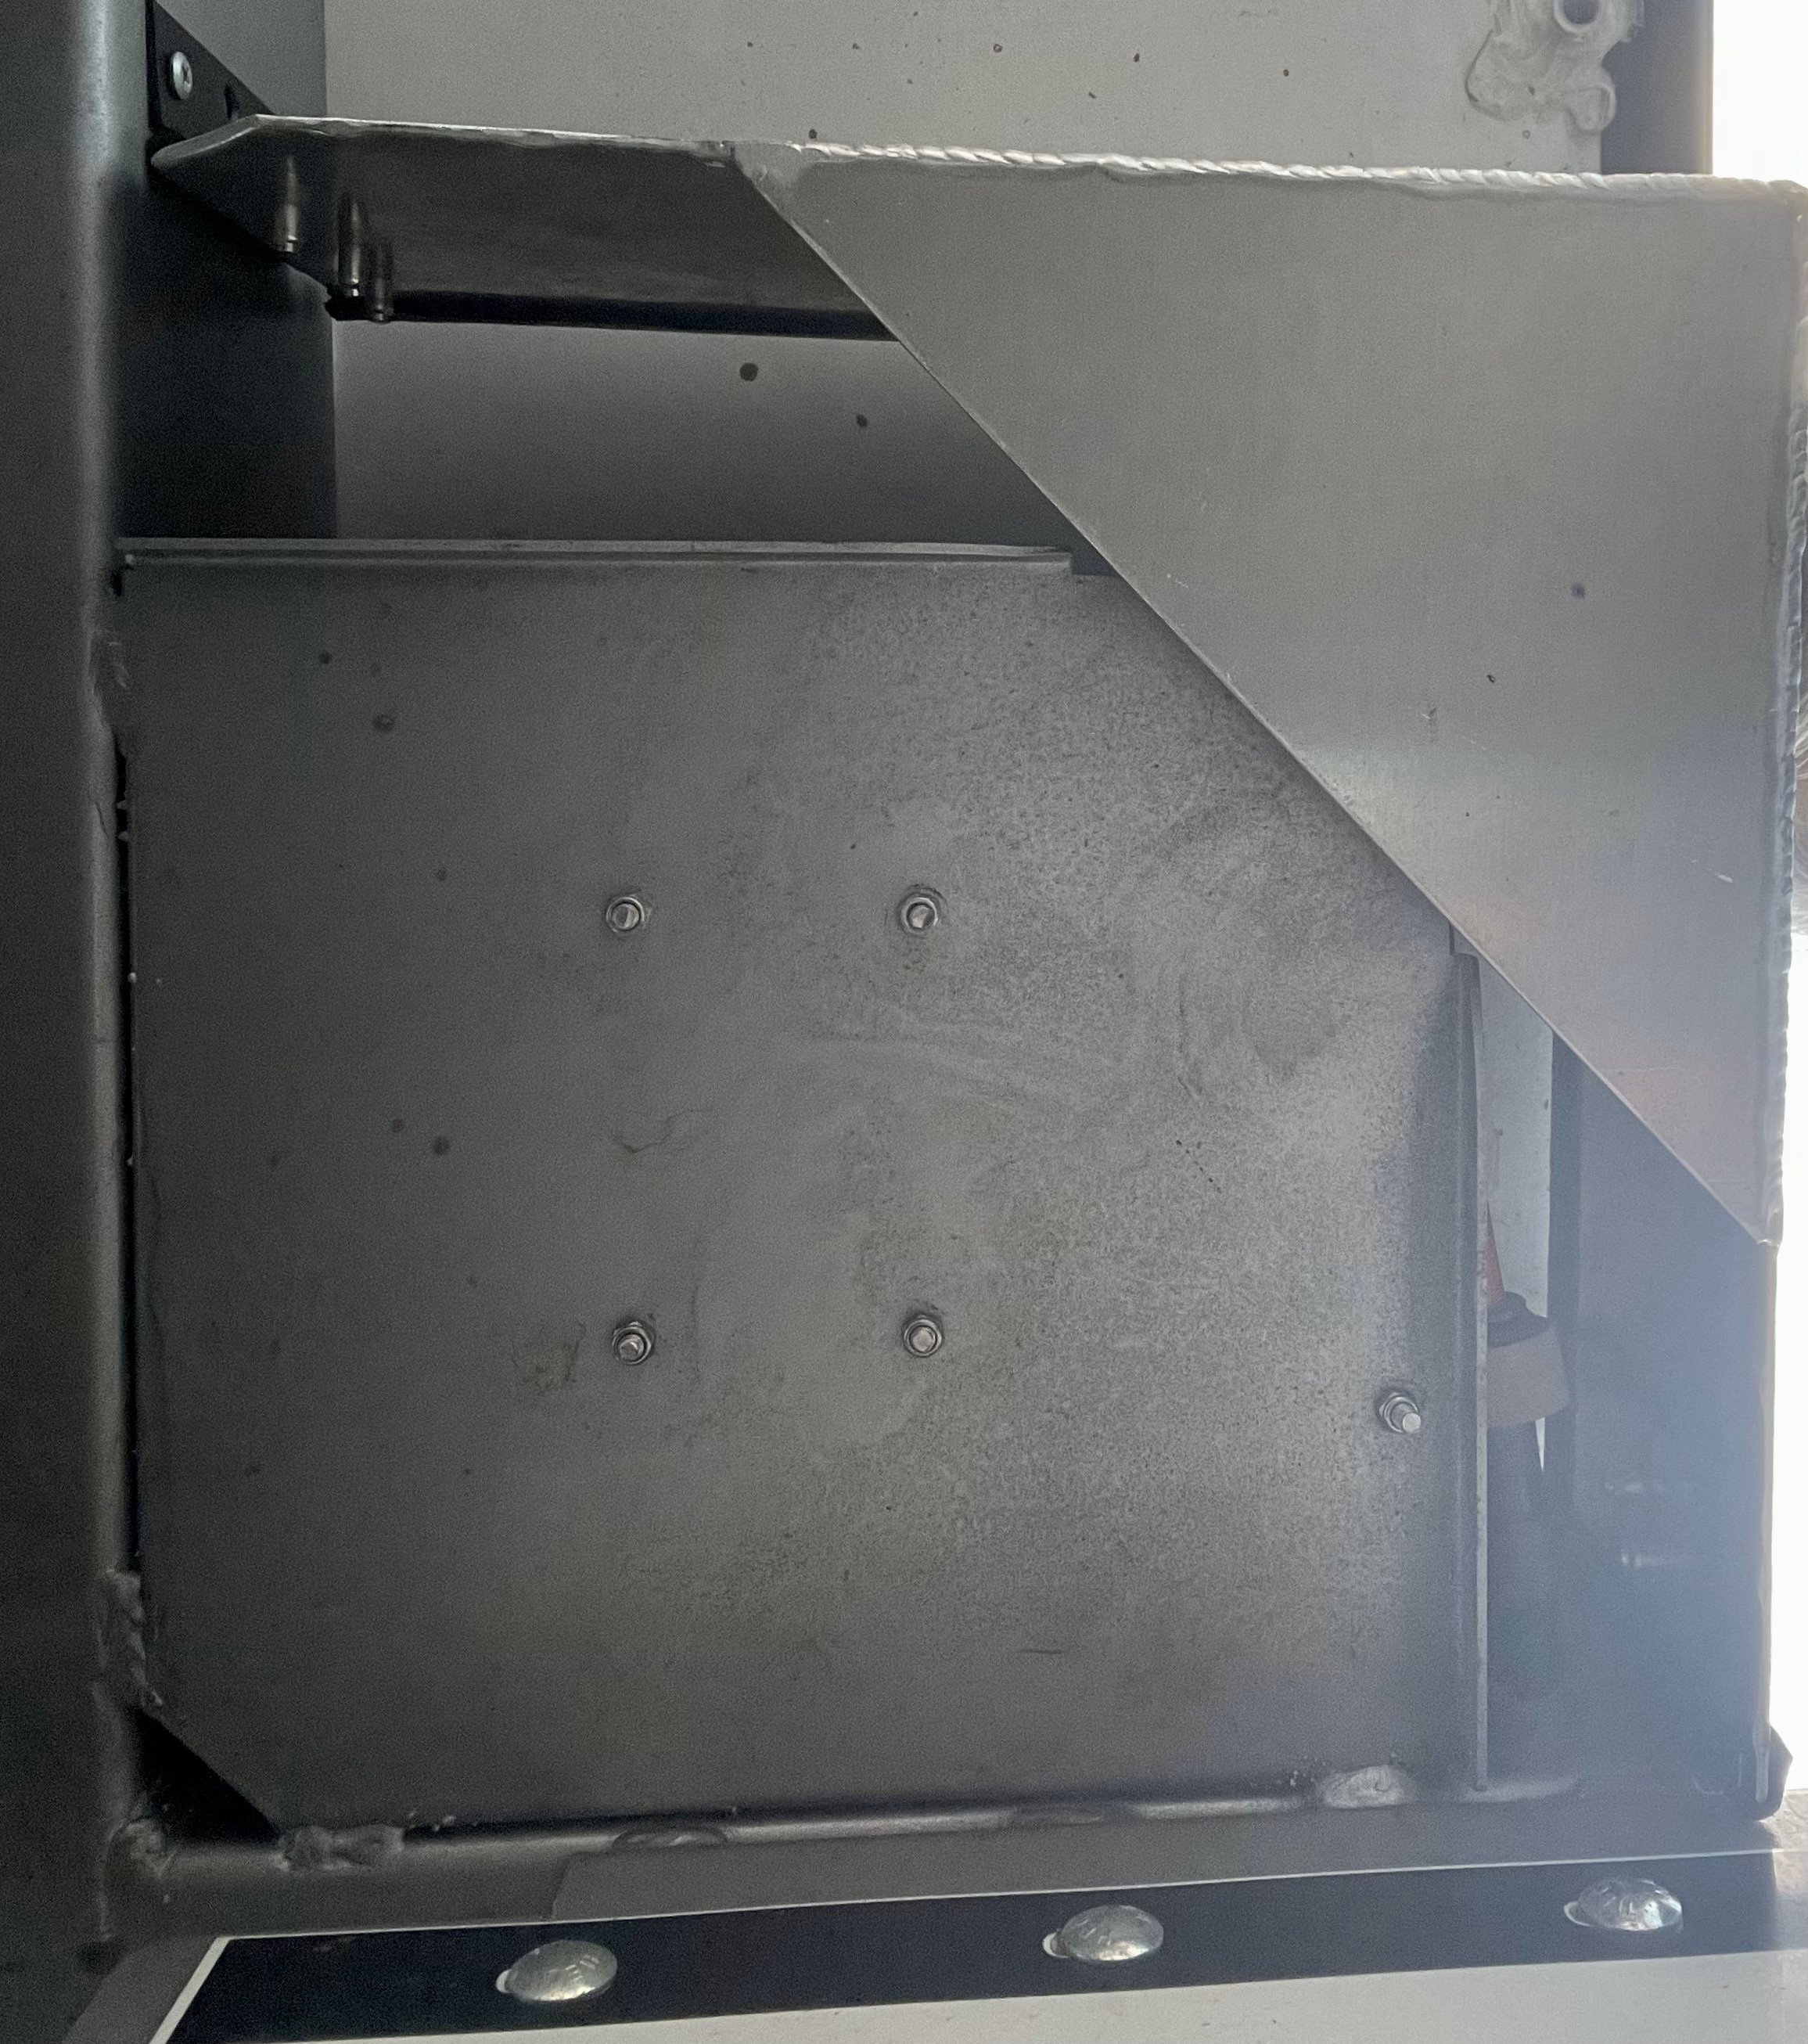
Battery Box
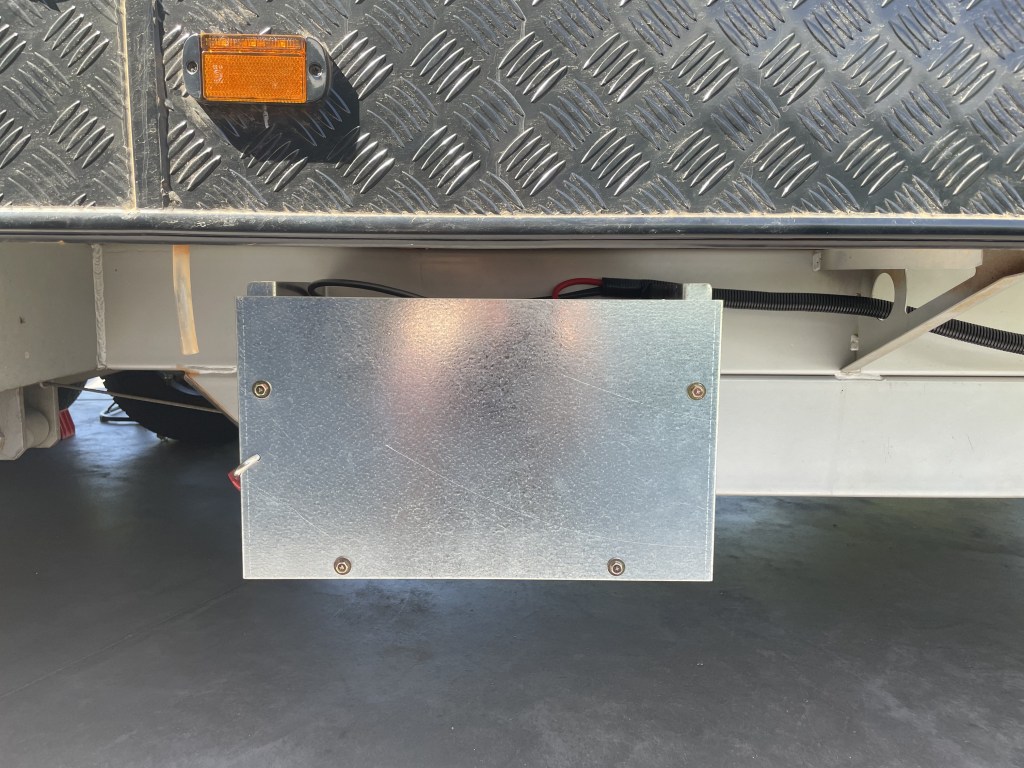
Our battery came installed under the bed. This is not ideal and was not what we ordered, so we have moved it to the outside. A very simple and easy task to do. The storage box was designed for the battery and sent to the sheet metal business to have cut and bent to shape. Battery installed and secured with a quality padlock. If you have more than one battery, simply duplicate the process. If they are all together the wiring can be kept to a minimum and all in one place. Our battery/solar panels are inside the front boot where they were installed by the Caravan Company.
When you use padlocks to secure anything on the outside it is imperative that you use high quality, tamper proof locks. Consider it a form of insurance on your asset.
Stickers

DO NOT OVERTAKE TURNING VEHICLE
Have you got one on the back of your caravan? If not and your configuration is >7.5m, read on…….
“Trucks and vehicles over 7.5 metres long that display a ‘Do Not Overtake Turning Vehicle’ sign on the back are legally allowed to take up more than one lane to turn corners, intersections and roundabouts. They can even use a right turn only lane to turn left or a left turn only lane to turn right. So, whether you’re turning left, right or you are at a roundabout, do not drive past or overtake a turning truck unless you are absolutely sure it’s safe to do so. The National Heavy Vehicle Regular’s program “We need Space” clearly explains why you should not overtake a turning truck. If a caravan or motorhome has a ‘Do Not Overtaking Turning Vehicle’ sign attached, the same rules apply.” (Ref: rvsafe.com.au)
For further information click here Do Not Overtake Turning Vehicle – RVSafe
Cleaning and Maintenance (Van)
Just like your home, your caravan and Tow tug needs maintenance and cleaning. One of the most common questions that arise on the caravan forums pertain to cleaning and maintenance. So here are some of our top tips for doing all of these without taking up too much of your time because after all we don’t want to be chained to our caravan and Ute with cleaning and maintenance but we do want to ensure our asset is kept in the best condition.
There will be those of us who live in our van full time and those who take their traditional annual or bi-annual trips away. Whichever category you fit into, the applications remain similar.
Internal
- Keep your cupboards and benchtops clean and free of dust, grime and dirt. Most vans will have a laminate product for these areas so the cleaning of them will be the same as for your own home. There is a recommendation to use a plastic cleaner like Vuplex. However, we use Nutrimetics OLC General cleaner diluted into a spray bottle using a dry wipe using microfibre cloths, Enjo or Nutrimetics cloths all do the same thing. In fact we use this method on all the surfaces in the van.
- The shower, toilet and ensuite can be all cleaned with the same products. We use normal shower cleaning products in the shower and basin. We would advise against using is harsh chemicals including products that contain methylated spirits, ammonia, etc., as these are not suitable for use on the plastic walls of the showers. There are plenty of products available including Enjo, OLC general cleaner, Tri-Nature and other natural products.
- The toilet is best cleaned with non-harsh products such as OLC Heavy duty cleaner or the Thetford products. The Thetford tank cleaner is great for the toilet canister. We plan the cleaning of this with a trip in the tow tug or between camps where we can dump the dirty contents of the clean. Be sure you use the recommended amount with hot water.
- Floor cleaning is very simple, just use exactly what you use at home. The floor is usually vinyl.
- Window blinds and locking tools. Modern caravans have the Mobicool windows or similar. We recommend that you obtain the correct removal details of the window frames from the dealer or caravan company for your windows. These areas must be kept cleaned and in good working order. The Mobicool brand can be easily clicked off and on, follow the manufacturer’s recommendations.
- Exhaust fan filter needs to be cleaned pending the amount of cooking done in your caravan. Simply soak in hot sudsy water then wash using a tooth brush being careful not to damage the delicate screen.
- Sink and plug receive a lot of use. Give them a regular polish and thorough clean using a paste product suitable for all stainless steel sinks.
- Screws – check all screws regularly, but more frequently if you travel on rough roads. Ladies this shouldn’t be limited to the blokes, have your own screw drivers and know how to use them.
- Hinges – keep these lubricated. They will dry out whether being used or not, in all weather conditions. We have a small can of WD40 in the van, Placing the oil onto all hingers, including piano hinges will not only keep them working but prevent against rusting.
- Window locking devices can become lose, so frequent maintenance will assist in keeping them in good working order and prevent the little ball bearings from being lost. We have found that we have needed to apply Loctite to the screws to keep them from loosening. The pic below shows the locking devices. The pic on the right is the underside of the lock where you do the tightening. Carefully peel back the backing to expose another screw inside. Tighten that screw, then replace the backing and re-screw back onto the window.
- Cupboard locks can also become lose over time due to usage and/or travel on rough roads. Check these regularly tightening them when they become lose.
External
- Do NOT use a high pressure cleaner on the plastic/marine smooth walls. It isn’t necessary to get the clean you need.
- Use the Outback RV Superwash. Two buckets – one with the RV Superwash and the other with water for rinsing. This product can also be used to clean the awning.
- Use a microfibre cloth to clean with. we use the Kmart floor mop with the long nobbles or the Enjo set are great. Obtain a handle that you can extend to reach the top of the van.
- Place a diluted mix of the RV wash in a spray bottle to help with quick cleans.
- Windows – clean these with the same product as you use for your internal cabinetry. NEVER use the standard window squeegee/rubber wipe. They will scratch the plastic windows.
- Underneath the van can be done with a high pressure cleaner.
- Ensure all bird, possum and other animal poo is removed immediately from both your van and tow tug. Some animal excrement contains high levels of acid that may deteriorate the paint/surface.
- Use degreaser on areas where grease is used. Wash with a detergent then rinse off before re-greasing the areas needed.
- Drains all need a good clean as does the sullage hose. Basic double action vinegar is the best nature cleaner that does a wonderful job. You can also use a drain cleaner to push down your drains. If you have a traditional plumbing set up with a ‘U’ shape trap under your sinks you will need to remove these in the standard way to clean them out. For the sullage hose you will need two people to do this or plug one end. Pour about 2 cups of vinegar into the sullage hose along with a liter of hot water. If possible, plug both ends and leave to soak (you will need to fill it right up if you do this method). Otherwise give the hose a good shake and if you have a drain cleaner, push that up and down the hose. Flush with clean water.
- Tanks, both fresh and grey water tanks, need regular cleaning to maintain hygienic facilities in your caravan and ensure you and your family are not exposed to bacteria. Those who park their van up between trips will need to do this prior to leaving. The best way to do this is using either the Thetford products or vinegar. We have found that pouring a full bottle of double action vinegar into the tank plus some water prior to travelling works best. After a few hours of travel, empty the tanks. Prior to refilling, flush them with clean water. You can only do this if you have a location to dispose of the water from the tanks once cleaned and able to fill them up with fresh water. Remember the water is neither grey nor black water, thus why using vinegar is the best option as it is harmless to the environment.
- Jockey Wheel must have regular maintenance on to ensure it won’t fail. Include in your annual maintenance program for the van. Pull it apart, complete the maintenance, lubricate and put back together. There are plenty of You Tube videos of how to do the process.
- Lubrication needs to be done at all points around your van and Ute. Check with the manufacturer’s manual to ensure all lubrication points are done. Some areas should be done with a silicone-based lubrication.
- Annex – if you have an annex, ensure you brush it down and clean off any dirt, grime, dust after each use. Pack it away into the bags they came in. Awning anti-flappers should be lubricated after use too.
- HWS – this is an interesting area. Firstly, you need to know what type of system you have to determine what maintenance is needed. If your HSW has a sacrificial anode, these must be changed at least 3-6 months pending use and water type you have put through it. Both types can be cleaned out especially if you have unknowingly put dirty water through it. Safety first, isolate the unit before working on it. Turn OFF HWS, power, water, all internal switches for gas and 240v.
- Finally, the roof. Where practicable, do NOT climb onto the roof of your caravan. Obtain a sturdy ladder that enables you to reach the roof without stretching, leaning or placing your life at risk. To clean, use an extendable cleaning brush, then hose off. To clean the solar panels, use a window squeegee to reach these. Importantly be safe and ensure you have another person to assist you with the ladder.
Remember there are a huge range of videos available on You Tube, manuals and instructions on caravan web pages that you can check to ensure you are conducting your maintenance correctly.
Setting the Van for Travel
If it’s your first-time caravanning, the endless list of requirements can send you into a spin. Whilst we have been caravanning and camping for over 40years, the new setups and layouts have tested our skills. So, I’ve put together some great tips for traveling, stowing items and checks for you.
Internal
Ensuring your cupboards and storage areas are packed correctly, evenly and securely where the load is distributed well, will ensure caravan sway is reduced or prevented. If you really wish to observe how much your caravan moves around inside, place a camera inside the van and drive for 15 minutes along an average road. This will give you an indication of how much things move around. Securing your items to minimise movement is paramount.
As you stack and pack your van consider these points:
- The heaviest items should be located over the axles and in the lower compartments.
- Limit placing heavy items in the front tunnel boots as this will add weight to your tow ball weight.
- Clothes – you can only wear a certain amount of clothing at any one time. Pack 15kg for each adult. We work as we go so we have extra clothing for work, including heavy work boots. If you purchase something new, pack up what you haven’t worn for a season and donate to charity.
- Limit the number of canned and bottled products. They add to your weight pretty quickly. I remove spices and herbs from their bottles and store in zip lock bags in a plastic tub. I also make up a lot of my own mixed spice and herb combinations. Check out these ideas in Cooking on the Road page.
- Books – limit yourself to 2-3 books at a time or borrow books from a virtual library. Join a library then download their app and you can borrow for free all the available books. There are also plenty of ‘free’ books from some apps for your tablet.
- Food – remember there are plenty of shops along your travels. Check out food ideas in Cooking on the Road page.
Let’s start with the cupboards. Where you have a cupboard that isn’t full, obtain baskets to store lose items into, this will prevent the items moving around as you travel, do make sure the items are stacked in firmly, use cleaning cloths to fill in gaps.
Overhead cupboards should only be stacked with light items. Heavy items will move around and if they fall out when you open them, there is a potential to damage your bench tops, yourself and possibly break. I store plastic items, containers, light items in all our overhead storage.
Drawers are excellent in a caravan making it very easy to store items and find them. The risk is loading them up with very heavy items. If you intend traveling with air-fryers, electric cooking pans, camp ovens, etc, locate them in the tunnel boot.
Items inside the caravan need to be secured. Things usually move forward with travel rather than back so consider this when you place anything on the floor. Also place items on the floor with a mat under them. Remove anything from benches.
Kitchen – place a tea towel in the sink then locate any bench top display items into the sink.
Ensuite – do the same as the kitchen sink. Shower – place the shower head inside a wash glove and lay on the floor of the shower. Remove any items on shelves and place into the wash basket in the shower base. Towels will travel hanging on the towel racks. However, if you are traveling on some off-road tracks, you may find they move/fall.
Secure the folding cafe table away and tie into place.
Windows & hatches – secure all latches on your windows. Leave blinds up or separated pending the type you have in your caravan. Wind all latches down firmly but not tight.
TV Antenna must be wound down.
External
Check the following prior to leaving.
- all areas/compartments/fold down tables that can be locked are locked and secured.
- Windows are secured.
- Step back and look up to the top of your van to check hatches and TV antenna are secured in place.
- Awning is rolled in and secured in place. We use the navigator awning arm protectors to minimise stone damage to the arms.
- Caravan leg stabilisers must be up and locked into position.
- Gas bottles are OFF. NEVER travel with the gas on. Check that the fridge has switched across to battery or manually placed onto the correct mode for travel.
- Power is unplugged, cable rolled up and stowed away.
- Water hose is removed, emptied of any water and rolled up and stowed. Remove your tap connector and secure into the hose so its readily available at the next stop.
- Step has been closed back under the van.
When you have completed all your checks, lock the door and complete the pre-start to check lights.
Ute Hacks and Upgrades
There is a huge range of towing vehicles out there and we are not going to cover these here. Do your own homework and research what will work for you and your configuration. Consider weights, GVM & GCM, to ensure your setup is compliant with the regulations. This website is a great start Truck Friendly – Caravan Safety
Canopy and Storage
For those with a Ute tow tug you may wish to consider placing a canopy on the back. Your choice whether it is chassis mounted or tray mounted. Being chassis mounted you have already removed the weight of the tray and lowered the height of the canopy floor. But the canopy needs to be aluminum.
Canopy – spend some time designing your canopy. If you are placing a roof rack on top, it must have strength points built into it to carry the load. Roof racks have variable capacities and what you intend using it for, check these out during the planning stage. We now only carry a tent, shovel and side awning. But on occasions we need to put the gas bottle on top to get refilled. Give a great deal of consideration to how the doors will be fitted. Oours have a hinge that if the wings are ripped off there will be no damage sustained to the body of the canopy. We replaced these after five years.
The internal fitment of the canopy is personal choice. We have one side for cooking and the fridge, the other side is the battery (powered by solar), tools, and his ‘stuff’. The top shelf allows storage for chairs, and a couple of containers/tubs.
If you have a wagon, there are some great options for drawers in the rear. Always check what issues you may face with your model and how you need to set up your rear area. A simple set up is a drawer fridge with a drawer next to it for storage and on either side, place the extra battery and inverter into the space. Alternatively, two drawers with a fridge on a slide on the top may work for your situation. With all of the above hacks, it is paramount that you consider the payload of your tow tug. Your Payload is the difference between the kerb weight and the GVM. When working with this consider the tow ball weight.
Other Add-ons
The following can only be added to your tow tug if you have had a GVM and GCM upgrade. The GVM can be done after registration, but the GCM can only be done pre-registration. Ensure you check the weight of every add-on you wish to have to ensure it doesn’t create an overloading situation. You cannot overload your tow tug beyond its GVM.
Of those extras there are just so many to choose from, but the most beneficial for our journey has been:
- Water container – easily installed using a 150mm diam PVC pipe with a tap and breather. Wherever you are, you will have water on tap. When installing the tapware, consider using stainless steel/marine level to prevent the internal tapware from rusting.
- Anderson plug – most tow tugs will have an Anderson plug for their caravan. This can also be used to use the mini air compressor to pump up tyres and air bags.
- Roof Rack – ideal for the solar panel, side awning, carrying things on the roof.
- Spare tyre – if you have a canopy, the best place for the spare tyre is on the back. When changing a tyre, it is much easier to remove the spare from that height than to crawl underneath the vehicle. If you have a wagon that is suitable, the rear bumper with spare tyre attachment is effective too.
- Bull Bar & Winch – these will eat into your payload. Consider the need versus the want.
